Quantcast
Channel: NETRESEC Network Security Blog
Viewing all 160 articles
Browse latest View live

Examining an x509 Covert Channel

$
0
0

Jason Reaves gave a talk titled“Malware C2 over x509 certificate exchange” at BSides Springfield 2017, where he demonstrated that the SSL handshake can be abused by malware as a covert command-and-control (C2) channel.

Jason Reaves presenting at BSides Springfield 2017

He got the idea while analyzing the Vawtrak malware after discovering that itread multiple fields in the X.509 certificate provided by the server before proceeding. Jason initially thought these fields were used as a C2 channel, but then realized that Vawtrak performed a variant of certificate pinning in order to discover SSL man-in-the-middle attempts.

Nevertheless, Jason decided to actually implement a proof-of-concept (PoC) that uses the X.509 certificate as a C2 channel. Jason’s code is now available on GitHub along with aPCAP file demonstrating this covert C2 channel. Of course I couldn’t resist having a little look at this PCAP file in NetworkMiner.

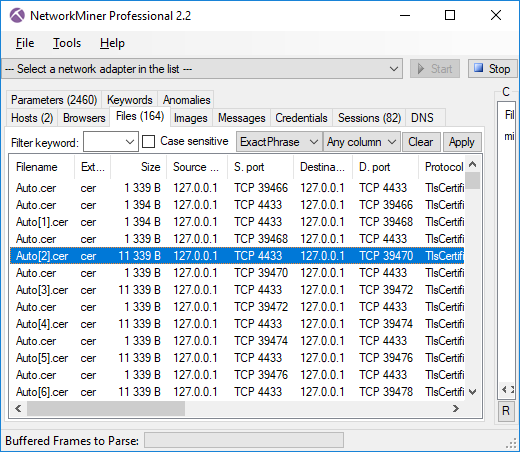
The first thing I noticed was that the proof-of-concept PCAP ran the SSL session on TCP 4433, which prevented NetworkMiner from parsing the traffic as SSL. However, I was able to parse the SSL traffic withNetworkMiner Professional just fine thanks to the port-independent-protocol-identification feature (a.k.a Dynamic Port Detection), which made the Pro-version parse TCP 4433 as SSL/TLS.

X.509 certificates extracted from PCAP with NetworkMiner
Image: X.509 certificates extracted from PCAP with NetworkMiner

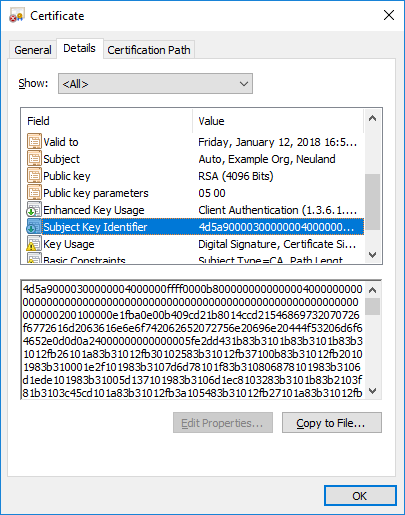
A “normal” x509 certificate size is usually around 1kB, so certificates that are 11kB should be considered as anomalies. Also, opening one of these .cer files reveals an extremely large value in the Subject Key Identifier field.

X.509 certificate with MZ header in the Subject Key Identifier field

Not only is this field very large, it also starts with the familiar “4D 5A” MZ header sequence.

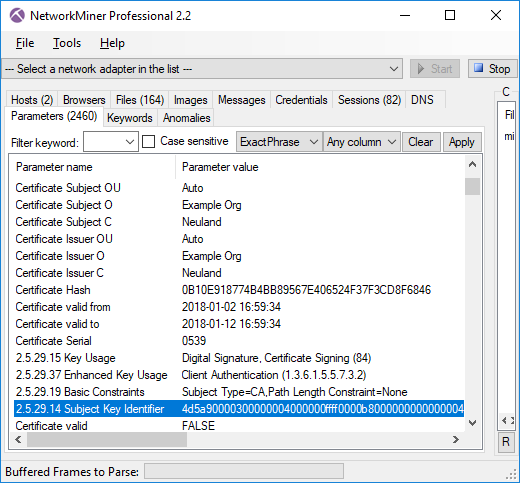
NetworkMiner additionally parses details from the certificates that it extracts from PCAP files, so the Subject Key Identifier field is actually accessible from within NetworkMiner, as shown in the screenshot below.

Parameters tab in NetworkMiner showing X.509 certificate details

You can also see that NetworkMiner validates the certificate using the local trusted root certificates. Not surprisingly, this certificates is not trusted (certificate valid = FALSE). It would be most unlikely that anyone would manage to include arbitrary data like this in a signed certificate.


Extracting the MZ Binary from the Covert X.509 Channel

Even though NetworkMiner excels at pulling out files from PCAPs, this is definitively an occasion where manual handling is required. Jason’s PoC implementation actually uses a whopping 79 individual certificates in order to transfer this Mimikatz binary, which is 785 kB.

Here’s a tshark oneliner you can use to extract the Mimicatz binary from Jason's example PCAP file.

tshark -r mimikatz_sent.pcap -Y 'ssl.handshake.certificate_length gt 2000' -T fields -e x509ce.SubjectKeyIdentifier -d tcp.port==4433,ssl | tr -d ':\n' | xxd -r -p > mimikatz.exe

Detecting x509 Anomalies

Even though covert channels using x509 certificates isn’t a “thing” (yet?) it’s still a good idea to think about how this type of covert signaling can be detected. Just looking for large Subject Key Identifier fields is probably too specific, since there are other fields and extensions in X.509 that could also be used to transmit data. A better approach would be to alert on certificates larger than, let’s say, 3kB. Multiple certificates can also be chained together in a single TLS handshake certificate record, so it would also make sense to look for handshake records larger than 8kB (rough estimate).

Bro IDS logo

This type of anomaly-centric intrusion detection is typically best done using theBro IDS, which provides easyprogrammatic access to the X.509 certificate and SSL handshake.

There will be false positives when alerting on large certificates in this manner, which is why I recommend to alsocheck if the certificates have been signed by a trusted root or not. A certificate that is signed by a trusted root is very unlikely to contain malicious data.

Facebook Share on Facebook  Twitter Tweet  Reddit Submit to reddit.com

Antivirus Scanning of a PCAP File

$
0
0
This second video in our series of network forensic video tutorials covers a quick and crude way to scan a PCAP file for malware. It's all done locally without having to run the PCAP through an IDS. Kudos to Lenny Hanson for showing me this little trick!

Antivirus Scanning of a PCAP File

Resources

IOCs
178.62.142.240
soquumaihi.co.vu
9fd51fb05cb0ea89185fc1355ebf047cC
8cf7b281a0db4029456e416dbe05d21d17af0cad86f67e054268f5e2c46c43ed
119.238.10.9
96b430041aed13413ec2b5ae91954f39
e79ef634265b9686f90241be0e05940354dc2c2b43d087e09bb846eec34dad35

Facebook Share on Facebook  Twitter Tweet  Reddit Submit to reddit.com

Analyzing Kelihos SPAM in CapLoader and NetworkMiner

$
0
0

This network forensics video tutorial covers how to analyze SPAM email traffic from the Kelihos botnet. The analyzed PCAP file comes from the Stratosphere IPS project, where Sebastian Garcia and his colleagues execute malware samples in sandboxes. The particular malware sample execution we are looking at this time is from the CTU-Malware-Capture-Botnet-149-2 dataset.

Resources

IOCs
990e5daa285f5c9c6398811edc68a659
e4f7fa6a0846e4649cc41d116c40f97835d3bb7d3d0391d3540482f077aa4493
6c55 5545 0310 4840

Check out our series of network forensic video tutorials for more tips and tricks on how to analyze captured network traffic.

Facebook Share on Facebook  Twitter Tweet  Reddit Submit to reddit.com

Examining Malware Redirects with NetworkMiner Professional

$
0
0

This network forensics video tutorial covers analysis of a malware redirect chain, where a PC is infected through the RIG Exploit Kit. A PCAP file, from Brad Duncan's malware-traffic-analysis.net website, is opened in NetworkMiner Professional in order to follow a redirect chain via a couple of hacked websites before delivering malware to the PC.

Resources
https://www.malware-traffic-analysis.net/2014/11/16/index.html
Meadgive on VirusTotal
CVE-2014-0569 Flash Exploit on VirusTotal
CVE-2012-0507 Java Exploit on VirusTotal
NetworkMiner Professional

IOCs
www.ciniholland.nl
24corp-shop.com
stand.trustandprobaterealty.com
793b698a82d999f1eb75525d050ebe16
f8482f5c4632fe237d062451b42393498a8d628ed9dee27147251f484e837a42
7b3baa7d6bb3720f369219789e38d6ab
e2e33b802a0d939d07bd8291f23484c2f68ccc33dc0655eb4493e5d3aebc0747
1e34fdebbf655cebea78b45e43520ddf
178be0ed83a7a9020121dee1c305fd6ca3b74d15836835cfb1684da0b44190d3

Check out our series of network forensic video tutorials for more tips and tricks on how to analyze captured network traffic.

Facebook Share on Facebook  Twitter Tweet  Reddit Submit to reddit.com

NetworkMiner 2.3 Released!

$
0
0

The free and open source network forensics tool NetworkMiner now comes with improved extraction of files and metadata from several protocols as well as a few GUI updates. But the biggest improvements for version 2.3 are in the commercial tool NetworkMiner Professional, which now supports VoIP call audio extraction and playback as well as OSINT lookups of file hashes, IP addresses, domain names and URLs.

I’m happy to announce that NetworkMiner 2.3 now does an even better job than before at extracting files and metadata from several protocols. Improvements have been made in the parsers for the following protocols: HTTP, IEC-104, IPv4, Modbus, SIP, SMB, SMB2, SMTP and SSL/TLS.

We have also added support for the SNMP protocol in NetworkMiner 2.3, so that SNMP community strings can be extracted and displayed on the Parameters and Credentials tabs.

SNMP Community Strings in NetworkMiner's Credential tab

Another change is that timestamps are now displayed using the UTC time zone instead of using the local time zone. We have also fixed a few GUI quirks in order to further improve the usability of the tool.


NetworkMiner Professional

The commercial version of NetworkMiner, i.e. NetworkMiner Professional, comes with several additional improvements which are presented below.

VoIP Call Playback

NetworkMiner Professional has received a new tab called “VoIP”, which enables audio playback of VoIP calls that are using SIP and RTP with G.711 μ-law or A-law encoding (u-Law is primarily used in North America and Japan while A-law is used in Europe and most other parts of the world).

Video: Audio playback and extraction to WAV from the “SIP_CALL_RTP_G711” PCAP file in the Wireshark Sample Captures.

The audio streams from the VoIP calls are also extracted to disk as .WAV files when codecsG.729 orG.711 (u-Law and A-Law) is used. NetworkMiner Professional also attempts to reassemble RTP streams encoded withG.722 to .au files.

OSINT Lookups of IP Addresses, Domains, URLs and File Hashes

Right-clicking a network host in NetworkMiner Professional’s Hosts tab brings up a context menu with options for performing lookups of IP and domain names using external sources. We refer to this method as open-source intelligence (OSINT) because the accessed data resides at publicly available sources.

OSINT IP lookup in NetworkMiner Professional 2.3

Clicking on an OSINT provider brings up a webpage with more detailed information about the selected IP address, such asIBM X-Force,mnemonic Passive DNS,Shodan,UrlQuery orVT. However, if you’re lazy like me, then you’ll probably click the “All above!” option instead, which will bring up all of the sources in separate tabs in your browser.

The full list of OSINT providers available for IP lookups includes APNIC Whois, BFK Passive DNS,Censys, Cymon,DNSTrails, ExoneraTor, Google Public DNS, GreenSnow.co, Hurricane Electric, IBM X-Force, Internet Storm Center, mnemonic Passive DNS,PacketTotal,Shodan,ThreatCrowd,ThreatMiner,UrlQuery and VirusTotal.

The domain name lookup menu contains a similar set of providers: BFK Passive DNS, Cymon,DNSTrails, Google Public DNS, Google Safe Browsing,Hybrid Analysis, IBM X-Force Exchange, mnemonic Passive DNS,MXToolBox, MyWOT, Norton Safe Web,PacketTotal,ThreatCrowd,ThreatMiner,URL Void, UrlQuery, VirusTotal, Website Informer, Webutation and Whoisology.


OSINT URL lookup in NetworkMiner Professional 2.3

Right-clicking a URL in the Browsers tab brings up a similar context menu, which additionally includes the following services for URL lookups: Google Safe Browsing, IBM X-Force,ThreatMiner,URLhaus andUrlQuery.


OSINT file hash lookup in NetworkMiner Professional 2.3

Finally, right-clicking on one of the files that NetworkMiner has extracted from a PCAP file brings up a menu for doing OSINT lookups based on the MD5 or SHA256 hash of the file. The sources used for lookups of hashes include IBM X-Force,PacketTotal,ThreatCrowd,TotalHash,UrlQuery, VirScan.org, Comodo Valkyrie,AlienVault OTX,Hybrid Analysis,ThreatMiner and VirusTotal.

Hybrid Analysis API Integration

Did you know that the malware analysis service Hybrid Analysis provides free API keys to people in the IT security community?

@HybridAnalysis: We are excited to announce that full API keys for file submissions are now available to everyone of the IT security community

This is a great move by the Hybrid Analysis team, and we’re happy to announce that we have leveraged their API in NetworkMiner Professional in order to submit files for analysis directly from within the NetworkMiner GUI. The API integration also enables you to query for an IP on Hybrid Analysis to see which previously submitted samples has communicated with that particular IP address.

Here are the steps required to enable the Hybrid Analysis API integration:


Credits

I would like to thankChris Sistrunk, Mats Karlsson and Michael Nilsson for suggesting several of the protocol and GUI improvements that have been incorporated into this new release. I’d also like to thank Doug Green and Ahmad Nawawi for discovering and reporting bugs in the IP and SSL parser respectively.


Upgrading to Version 2.3

Users who have purchased a license for NetworkMiner Professional 2.x can download a free update to version 2.3 from ourcustomer portal.

Those who instead prefer to use the free and open source version can grab the latest version of NetworkMiner from the officialNetworkMiner page.

FOR GREAT JUSTICE!

Facebook Share on Facebook  Twitter Tweet  Reddit Submit to reddit.com

CapLoader 1.7 Released

$
0
0

We are happy to announce the release ofCapLoader 1.7!CapLoader 1.7 logo

Here’s an overview of what’s new in this release:

  • Regular expression searching
  • Lookup of IP addresses using online services
  • Lookup of domain names using online services
  • Improved protocol fingerprinting speed and precision
  • Support for GRE, IGMP and ICMPv6 flows
  • More precise period estimation of “periodic services

Regular Expressions Search

CapLoader’s “Find Keyword” window has been extended with an option to search flows using regular expressions (regex) as an alternative to searching for strings or byte sequences. With help of the powerful regex syntax built into .NET this new search option enables very flexible searching.

Searching for Alfa Ransomware flows in CapLoader using regex
Image: Searching for Alfa Ransomware flows using regex

The Find Keyword window can be opened by clicking Edit > Find Keyword, or by pressingCtrl+F after having loaded a PCAP file.


OSINT Lookups of IP Addresses and Domains

We added support for querying online services for IPs and domain names to thelatest release of NetworkMiner, now it’s time to add this very handy feature to CapLoader as well.

Right-clicking a Flow, Service or Host in CapLoader brings up a context menu with links to various online resources that might have more details regarding the clicked IP address or domain name.

CapLoader OSINT lookups

The services available for IP address OSINT lookup include:
APNIC Whois, Censys, Cymon, ExoneraTor, Google Public DNS, GreenSnow.co, Hurricane Electric, IBM X-Force, Internet Storm Center, mnemonic Passive DNS, PacketTotal, SecurityTrails, Shodan, ThreatCrowd, ThreatMiner, UrlQuery and VirusTotal.

The domain name lookup menu contains a similar set of providers:
Cymon, Google Public DNS, Google Safe Browsing, Hybrid Analysis, IBM X-Force Exchange, mnemonic Passive DNS, MXToolBox, MyWOT, Norton Safe Web, PacketTotal, SecurityTrails, ThreatCrowd, ThreatMiner, URL Void, UrlQuery, VirusTotal, Website Informer, Webutation and Whoisology.


Protocol Identification

The dynamic protocol detection (or Port Independent Protocol Detection, aka “PIPI”) in CapLoader has been improved to support even more protocols than before. We have also fine-tuned the protocol identification algorithm to be both faster and more accurate.

CapLoader 1.7 identifying SSL on non-standard port
Image: Traffic to TCP 8777 identified as SSL (PCAP file from Stratosphere IPS)


Updating to the Latest Release

Users who have previously purchased a license for CapLoader can download a free update to version 1.7 from our customer portal. All others can download a free 30 day trial from the CapLoader product page (no registration required).


Credits

We’d like to thank Michael Nilsson for suggesting the IP and domain name lookup feature and Tohar Braun for suggesting RegEx search support. We’d also like to thank Ralf Alvarsson and Jarmo Lahtiranta for reporting bugs that have been resolved in this release.

Facebook Share on Facebook  Twitter Tweet  Reddit Submit to reddit.com

Detecting the Pony Trojan with RegEx using CapLoader

$
0
0

This short video demonstrates how you can search through PCAP files with regular expressions (regex) usingCapLoader and how this can be leveraged in order to improve IDS signatures.

The EmergingThreats snort/suricata rule mentioned in the video isSID 2014411“ET TROJAN Fareit/Pony Downloader Checkin 2”.

The header accept-encoding header with quality factor 0 used by the Pony malware is:
Accept-Encoding: identity, *;q=0

And here is the regular expression used to search for that exact header:\r\nAccept-Encoding: identity, \*;q=0\r\n

After recording the video I noticed that the leaked source code for Pony 2.0 actually contains this accept-encoding header as a hard-coded string. Have a look in theredirect.php file, where they setcurl’sCURLOPT_HTTPHEADER to this specific string.

Pony using curl to set: Accept-Encoding: identity, *;q=0

Wanna learn more about the intended use of quality factors in HTTP accept headers? Then have a look at section 14.1 of RFC 2616.

Finally, I'd like to thank Brad Duncan for running themalware-traffic-analysis.net website, your PCAP files often come in handy!

Facebook Share on Facebook  Twitter Tweet  Reddit Submit to reddit.com

NetworkMiner 2.3.2 Released!

$
0
0

NetworkMiner 2.3.2 was released this morning, and there was much rejoicing!

yaay
Image: U.S. Navy photo by Stuart Phillips (source)

This new release primarily fixes bugs related to extraction ofemails andVoIP calls. We have also corrected a bug affecting the json/CASE export function in NetworkMiner Professional.

The OSINT domain name lookup in NetworkMiner Professional has also been extended with thecrt.sh Certificate Search and DNSTrails has been replaced withSecurityTrails.

NetworkMiner Professional 2.3.2 Image: NetworkMiner Professional 2.3.2 with “vm_win7.pcap” from University of Twente’s Data Exfiltration Malware dataset loaded.

Credits

NetworkMiner 2.3.2

We’d like to thank Carlos Kasprzykowski for notifying us about the VoIP bug, which caused lots of files to be written to the %TEMP% directory when there were more than 50 simultaneous SIP+RTP calls. We also wanna thank Josh Wilczek for reporting a bug in the “User Defined Port-to-Protocol Mappings” in NetworkMiner Professional’s Settings window, which also has been fixed in the 2.3.2 release.

Upgrading to Version 2.3.2

Users who have purchased a license for NetworkMiner Professional 2.x can download a free update to version 2.3.2 from ourcustomer portal. Those who instead prefer to use the free and open source version can grab the latest version of NetworkMiner from the officialNetworkMiner page.

⛏ FOR GREAT JUSTICE! ⛏

Facebook Share on Facebook  Twitter Tweet  Reddit Submit to reddit.com

Reverse Engineering Proprietary ICS Protocols

$
0
0
Steve Miller at SEC-T

One of the highlights at this year’s SEC-T conference in Stockholm wasSteve Miller’s talk titled "Reversing the TriStation Network Protocol". In this talk Steve covered his quest to better understand the TRITON malware, which had been used in a targeted attack of an industrial control system (ICS). Steve didn’t disclose the type or location of the plant, saying “Don’t ask me who it was, ‘cause I can’t say” when the Q&A started. However, anarticle in the Wall Street Journal points out that it was a petrochemical plant in Saudi Arabia that had been hacked.


Targeting Safety Instrumented System

The TRITON malware (also called TRISIS) was used to target a safety instrumented system (SIS) from Schneider Electric called Triconex. A SIS is typically not used to control the process of a plant, but rather to detect abnormal operating conditions and safely shut down the industrial process if needed.

I could elaborate a lot regarding the consequences of attacking the SIS, but the good guys from Dragos have already done a great job explaining this in their“TRISIS Malware” report.


Reverse Engineering the ICS Protocol

The communication protocol used by the Triconex controllers is called TriStation, which is a proprietary protocol. This means that there were no publicly available specifications available for the protocol at that time. There was also no Wireshark dissector that could parse TriStation traffic. Nevertheless, Steve’s initial reaction to this was “Awesome, undocumented things are my favorite things!”

Steve Miller: Awesome, undocumented things are my favorite things!

Unfortunately Steve wasn’t able to get hold of a single PCAP file with the TriStation network protocol, which made it really difficult to reverse engineer the protocol implementation in the TRITON malware. The only piece of actual TriStation network traffic he was able to get hold of was a hex dump of a TriStation packet in an academic paper.

Exceprt from: Attack Induced Common-Mode Failures on PLC-Based Safety System in a Nuclear Power Plant: Practical Experience Report

Armed with only the hexdump and Wireshark’s text2pcap Steve managed to piece together an actual PCAP file containing a single frame with a TriStation packet inside.

Wireshark with Steve's re-created TriStation PCAP

As you can see in the image above, Wireshark doesn’t decode any of the application layer data coming from TCP port 1502 (which TriStation uses). He therefore implemented a Wireshark Lua dissector for the TriStation protocol. And some time later the people from Nozomi Networks even implemented a properWireshark dissector for the TriStation protocol.

BSI’s ICS-SEC team have now also created Snort IDS rules specifically for the TriStation protocol. These IDS rules trigger on events like:

  • Packets sent to the controller from an unauthorized host
  • Malicious commands used by the TRITON malware to read and write to the RAM of the SIS controller as well as to execute code

The Importance of Sniffing ICS Traffic

I’ve been trying to convince asset owners, who use ICS in their power plants, factories, water treatment facilities etc, to start capturing the network traffic and storing it as PCAP files for many years now. However, asset owners sometimes try to argue that there is no point in capturing their traffic since it is using a proprietary protocol. Even Ralph Langner has opposed to the idea of capturing ICS network traffic ina blog post, which I have criticized. So, how difficult is it to write a parser for a proprietary protocol?

I have personally implemented support for over 30 application layer protocols inNetworkMiner, but unlike Steve I’ve always had access to at least one PCAP file and some form of documentation of the protocol. However, I’ve found that many real-world protocol implementations don’t follow specifications properly. In these cases I’ve found that having access to PCAP files with real-world network traffic is more important than having a full protocol specification.

Even complex proprietary protocols like the old proprietary Skype protocolhas been reverse engineered, so with access to network traffic of a protocol combined with a binary that uses this protocol I’d say that pretty much any network protocol can be reverse engineered.

Steve’s SEC-T talk also proves that ICS protocols are no different, since they too can be reverse engineered without having a protocol specification or RFC.

Capturing network traffic in ICS networks is never wrong. There might not be parsers available today for all the protocols you’re using. But once a parser or IDS signature becomes available for the protocol you’re using, you can simply use that to analyze previously captured network traffic from your ICS network. Also, in the wake of an incident you might actually end up writing a parser (as in the TRITON case) or a custom IDS rule, in which case having historical network traffic from your plant in invaluable!

For more information on this topic I’d suggest reading my blog post titled “Monitor those Control System Networks!” from 2011, which still is highly relevant.

I’m also happy to announce that two PCAP files containing TriStation network traffic have been linked from our list of publicly accessible PCAP files today (see the “SCADA/ICS Network Captures” section).

And remember: PCAP or it didn’t happen!

Facebook Share on Facebook  Twitter Tweet  Reddit Submit to reddit.com

Remote Packet Dumps from PacketCache

$
0
0
PacketCache logo

This blog post describes how to dump a packet capture (pcap file) on a remote computer, which runs the PacketCache service, and retrieve that pcap file using only PowerShell.

PacketCache is a free Windows service that continously sniffs network traffic on all interfaces (Ethernet, WiFi, 3G, LTE etc) and maintains a cache of the most recent traffic in RAM. This enables incident responders to read PCAP data out of a PC's PacketCache, for example when an IDS or anti-virus alerts on something potentially malicious. Unfortunately, there is no central management tool for PacketCache, which means that the PCAP data has to be dumped locally at the PC that triggered the IDS or AV alert.

There are a few workarounds "hacks" available to solve this problem, but the most elegant solution is to leverage PowerShell Remoting / WinRM in order to trigger a remote PacketCache instance to create a PCAP file and then copy the PCAP file through the same PowerShell session. To make things even simpler we've created aPowerShell script that can be used to download a PCAP file from any machine running PacketCache. Okay, maybe not *any* machine, the script only works on PCs that you have admin credentails for. Nevertheless, here's how you run the script from a PowerShell prompt:

PS C:\> .\ReadRemotePacketCache.ps1 DESKTOP-LT4711 Administrator
[*] Dumping PacketCache at DESKTOP-LT4711
[*] Copying PCAP dump from DESKTOP-LT4711
[*] Remote PacketCache data saved to DESKTOP-LT4711_181112_1337.pcap
PS C:\>

The ReadRemotePacketCache.ps1 script can be downloaded from thePacketCache product page.


Configuring Hosts for PowerShell Remoting

If you have not previously set up your environment for PowerShell remoting, then you will need to follow these steps before invoking the "ReadRemotePacketCache.ps1" script as above.

On the remote PC, start PowerShell as administrator and enable PowerShell remoting with the "Enable-PSRemoting" command as shown here:

PS C:\> Enable-PSRemoting -SkipNetworkProfileCheck -Force
WinRM has been updated to receive requests.
WinRM service type changed successfully.
WinRM service started.

WinRM has been updated for remote management.
WinRM firewall exception enabled.
Configured LocalAccountTokenFilterPolicy to grant administrative rights remotely
to local users.

PS C:\>

Configuring TrustedHosts for Workgroups

You will also need to set up a trust relationship between the local and remote host. If the remote PC is member of an Active Directory domain, then this trust is already in place. However, if you're in a workgroup or the computers are not in the same domain, then you will need to set the TrustedHosts item like this on both the local PC and the remote PC:

PS C:\> Set-Item WSMan:\localhost\Client\TrustedHosts [IP or Hostname of the other PC]
PS C:\> Get-Item WSMan:\localhost\Client\TrustedHosts
PS C:\> Restart-Service WinRM

Note: if you need to dump PacketCache data from several remote hosts, then you can replace the IP/hostname with '*' to trust any PC or supply a comma separated list of individual hostnames or IPs to trust.

If you've configured TrustedHosts correctly, then you should be able to run the "ReadRemotePacketCache.ps1" script as shown previously. However, if the remote PC isn't in TrustedHosts, then you'll most likely get an error message like this:

PS C:\> .\ReadRemotePacketCache.ps1 10.0.13.37 Administrator
New-PSSession : [10.0.13.37] Connecting to remote server 10.0.13.37 failed with the following error message : The WinRM client cannot process the request. If the authentication scheme is different from Kerberos, or if the client computer is not joined to a domain, then HTTPS transport must be used or the destination machine must be added to the TrustedHosts configuration setting. Use winrm.cmd to configure TrustedHosts. Note that computers in the TrustedHosts list might not be authenticated. You can get more information about that by running the following command: winrm help config. For more information, see the about_Remote_Troubleshooting Help topic.

Automating Remote Artifact Collection

With PowerShell remoting in place you're not limited to just dumping packets from a remote PacketCache service, you can also dump the RAM or copy individual files from the remote computer. This comes in handy in order to implement an automated evidence/artifact collection, for example when a high-severity alert is received by your SIEM.

There are frameworks in place that can help with aquisition of memory and files, such asMatthew Green's Invoke-LiveResponse tool, which can dump memory with WinPMEM and leverage PowerForensics to enable remote raw disk access. Some organizations even start sniffing packets at events like this, but this will only capture the traffic from after a potential compromize. This is where PacketCache comes in, since it can allow you to retrieve packets ranging back as far as a couple of days before the alert.


Credential Theft

It is recommended to use unique passwords for each local account with administrator rights. This practice is extra important if you plan to log into a potentially compromized host using administrator credentails, as described in this blog post. You might also want to lock down the local admin accounts even further in order to minimize the consequences of the admin credentials falling into the wrong hands. See Microsoft's articles on "Local Accounts" and "Attractive Accounts for Credential Theft" for more recommendations regarding how to secure local admin accounts.


PacketCache is Free

CC BY-ND PacketCache is free to use, even commercially. It is released under a Creative Commons Attribution-NoDerivatives 4.0 International License, which means that you can copy and redistribute PacketCache in any medium or format for any purpose. You can download PacketCache here:

https://www.netresec.com/?page=PacketCache

The PowerShell script presented in this blog post is also shared under the same CC license and can be downloaded from thePacketCache product page.


Credits

I'd like to thank Dick Svensson for suggesting the use of PowerShell Remoting to read PacketCache data remotely!

Facebook Share on Facebook  Twitter Tweet  Reddit Submit to reddit.com

TorPCAP - Tor Network Forensics

$
0
0
PcapTor

Unencrypted network traffic, destined for the Tor network, is sent between localhost TCP sockets on computers running Tor clients, such as the Tor Browser. In this blog post I show how anonymous Tor browsing can be visualized, by loading a PCAP file with localhost traffic into NetworkMiner. We call this technique TorPCAP.

Tor is a secure platform that enables users to browse the web anonymously. The Tor Project website describes the tool as:

“Tor is free software and an open network that helps you defend against traffic analysis”

It is also possible to hostanonymous “onion services” on the Dark Web using Tor:

“Tor makes it possible for users to hide their locations while offering various kinds of services, such as web publishing or an instant messaging server. Using Tor "rendezvous points," other Tor users can connect to these onion services, formerly known as hidden services, each without knowing the other's network identity.”

Capturing Tor Traffic Before it gets Encrypted

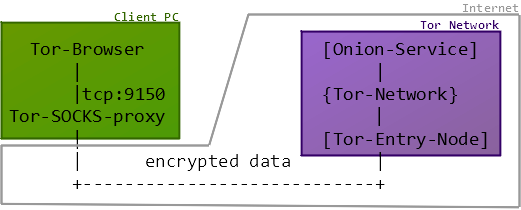
Tor installations include a SOCKS proxy listening on TCP port 9150 on localhost (127.0.0.1). This local SOCKS proxy is used by the Tor Browser, which connects to the proxy in order to have its traffic encrypted and forwarded to the Tor network. This means that by sniffing traffic on localhost it’s actually possible to create a solid forensic trail of all traffic a PC sends to and from the Tor network.

Tor Browser and SOCKS

You can use tcpdump to capture the localhost traffic on PCs running theTails OS orTor Browser in MacOS or Linux. If you’re running the Tor Browser in Windows, then we recommend using RawCap to sniff the localhost traffic (RawCap is a portable standalone tool that doesn’t need WinPcap or NDIS drivers to work).

In order to make sense of the captured traffic you need a tool that can parse the SOCKS protocol (RFC 1928). NetworkMiner includes a SOCKS parser since version 2.1, which can be used to extract and reassemble data going to and from the Tor network.


   Image Credit: Ken Edge    Eldon by @kenedgeiscool

Demo: Analysing TorPCAP Network Traffic

A user, let’s call him “Eldon”, used Tor for some dark-web activity on November 30, 2018. Eldon was using the Tor Browser on a Windows PC and RawCap was used to capture the localhost network traffic from Eldon’s computer. A PCAP file with the captured packets from Eldon’s PC can be accessed here. Please feel free to open this capture file with NetworkMiner, in order to follow along in this analysis.


File   : rawcap-localhost-tor.pcap
Size   : 1.47 MB
SHA256 : 9134FA542B388498C2A58A2E1424FCD4AF466CE7117DBE9AAFD0A031CC8209B8


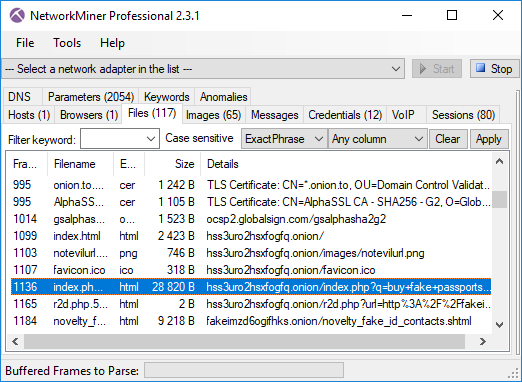
The “Files” tab in NetworkMiner contains a list of all files that have been reassembled from the analyzed PCAP file. This file listing reveals that Eldon used the “not Evil” search engine (hss3uro2hsxfogfq[.]onion) to search for “buy fake passports” in frame 1136.

NetworkMiner's Files tab with not Evil search

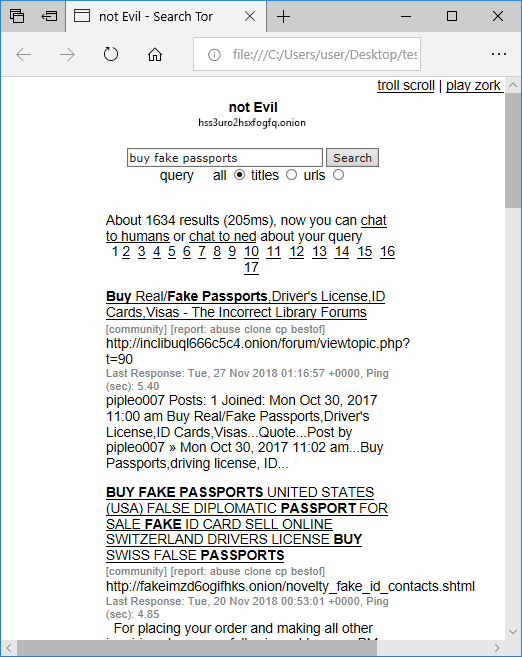
The search result page from not Evil has been reassemled by NetworkMiner as “index.php.CB66877E.html”. By opening this HTML document in a browser we can see which search results Eldon got (no Internet connection is needed to open the reassembled html).

not Evil search in Tor

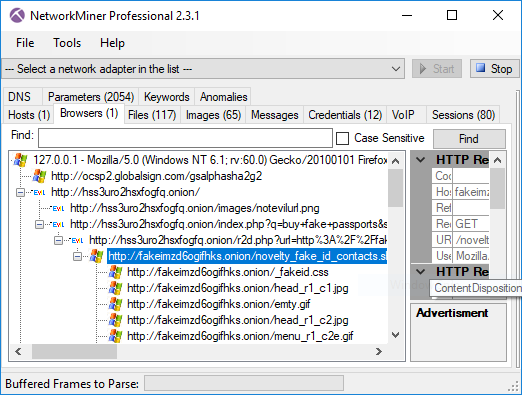
The “Browsers” tab in NetworkMiner Professional shows that Eldon followed the link for entry #2 in his search results (BUY FAKE PASSPORTS [...]), leading him to the “fakeimz[...].onion” website.

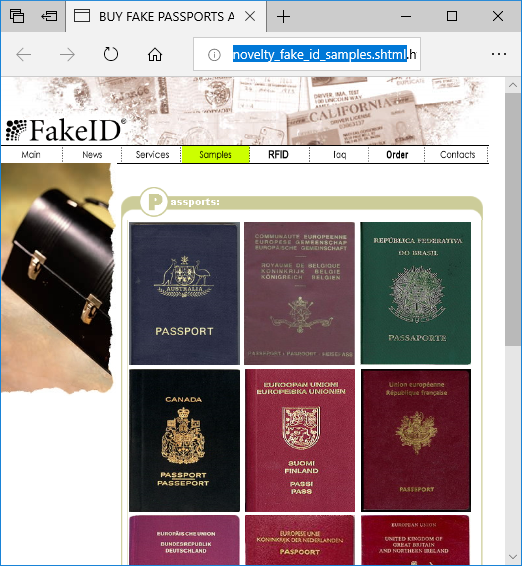
HTML document in Edge reassembled by NetworkMiner

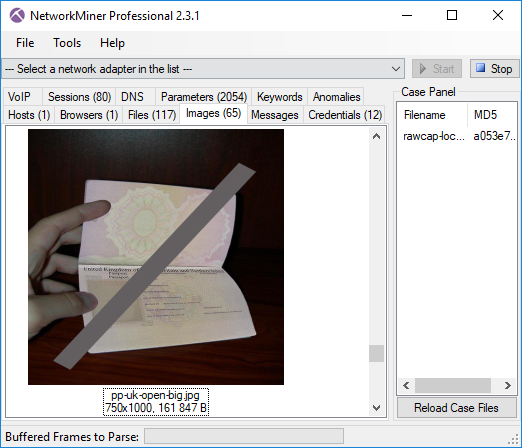
Eldon then proceeded to list the available passports (see the reassembled file “novelty_fake_id_samples.shtml” in frame 1837) and chose the UK passport (“pp-uk-open-big.jpg”).

novelty_fake_id_samples.shtmlNetworkMiner Professional Images tab with pp-uk-open-big.jpg

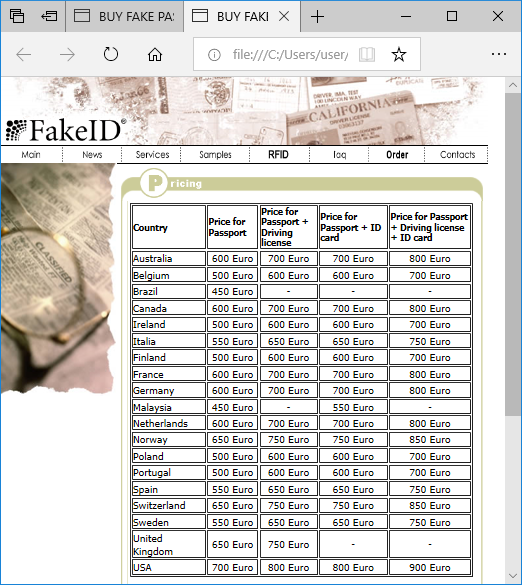
As Eldon proceeded he got a price list for the fake passports offered at this site (“novelty_fake_id_pricing.shtml”), but we don’t see any evidence of him actually completing a purchase of a fake UK passport.

HTML file reassembled by NetworkMiner opened in Edge browser

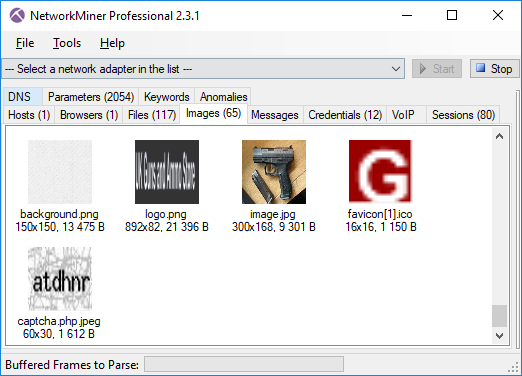
If we go back to the Images tab in NetworkMiner, and scroll a bit further down we see a picture of a gun. Let’s see where it comes from.

NetworkMiner Images tab with gun pic

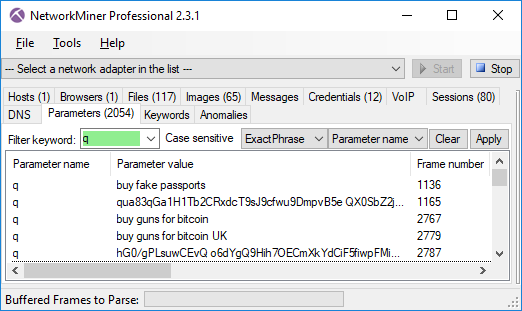
It turns out Eldon also searched for “buy guns for bitcoin UK”. You can list all search engine queries by looking for entries in the “Parameters” tab with parameter name “q”. This technique is applicable for the “not Evil” search engine as well as most clearnet search engines, like Google, Bing, Yahoo! and DuckDuckGo (disregarding the fact that they use TLS).

NetworkMiner Parameters tab with web searches

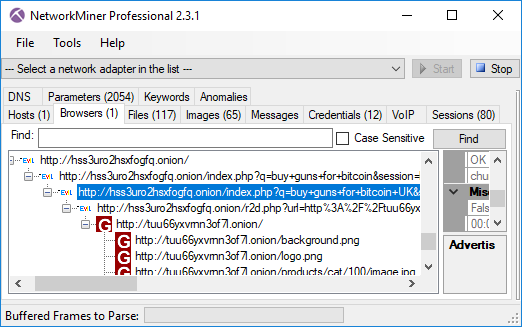
The Browsers tab shows us that Eldon clicked on a link to the “UK Guns and Ammo Store” (tuu66[...].onion).

not Evil search in NetworkMiner Professional Browsers tab

This website has also been passively reassembled by NetworkMiner and can be opened offline in a browser (see “index[2].html”).

UK Guns and Ammo Store (dark web)

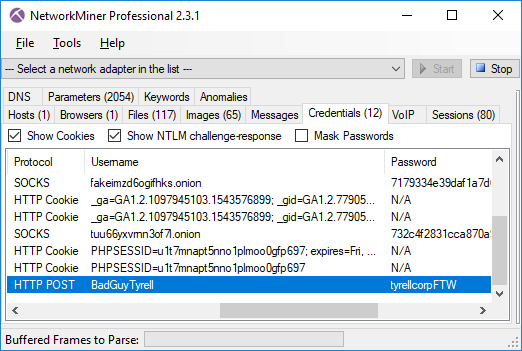
The Credentials tab in NetworkMiner shows the username and password used by Eldon to log into the website:

Credentials tab in NetworkMiner Professional 2.3.1 showing username and password sent over Tor to an onion service

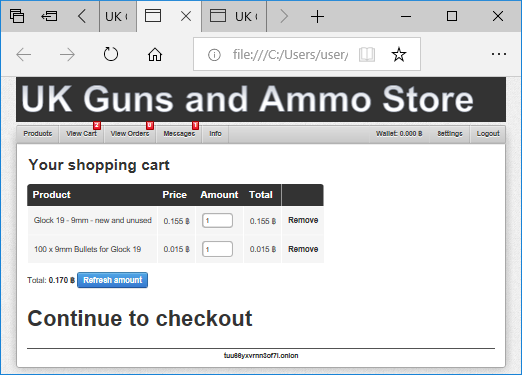
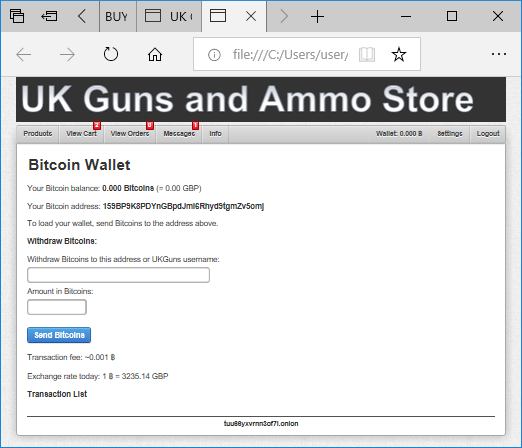
After logging in, Eldon puts two items in his shopping cart (see “cart.php[1].html”), but gets a message saying “Not enough balance for this order” when clicking the “Continue to Checkout” link. It seems Eldon’s account at the dark-web weapons store doesn’t have any Bitcoins (see “wallet.php.html”)

UK Guns and Ammo Store - Shopping Cart (dark web)UK Guns and Ammo Store - Bitcoin Wallet (dark web)

Side Note - Web Trackers and Tor

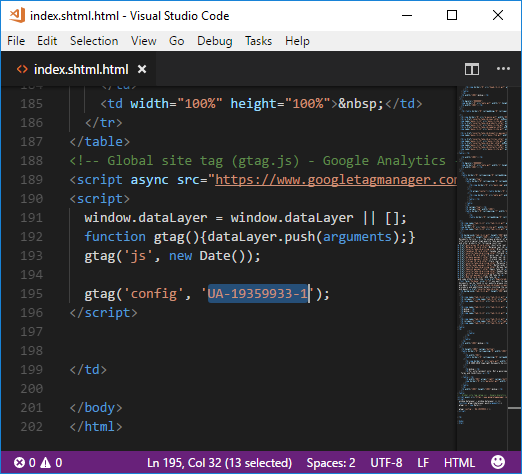
It is considered bad practice to use clear-net tracking services, like Google Analytics, to track users visiting an onion service. However, we noticed that the fake passports website uses a Google Analytics script with tracking ID “UA-19359933-1”.

Dark Web HTML with Googla Analytics ID UA-19359933-1

Googling this ID led us to this very similar website:
hxxp://www.buypassportsfake[.]cc

hxxp://www.buypassportsfake[.]ccFacebook Share on Facebook  Twitter Tweet  Reddit Submit to reddit.com

NetworkMiner 2.4 Released

$
0
0
NetworkMiner 2.4

We are proud to announce the release ofNetworkMiner 2.4 today! The new version comes with several improvements, such as username extraction from Kerberos traffic, better OS fingerprinting and even better Linux support.


Protocol Updates

The Kerberos v5 implementation inNetworkMiner 2.4 can be used to to extract usernames, hostnames and realms (domains) from unencrypted Kerberos requests/responses on port 88. NetworkMiner also parses and extracts usernames etc. from HTTP auth headers and SMB security blobs when they use Kerberos for authentication.

Kerberos username (Administrator) and realm (DENYDC.COM) in NetworkMiner's Host tab
Image: NetworkMiner showing extracted username (Administrator) and realm (DENYDC.COM) from theWireshark sample capture file “Krb-contrained-delegation.cap”.

NetworkMiner also automatically attempts to parse traffic to TCP port 11371 as HTTP in order to extract GPG keys sent using the HKP protocol.


MAC Address Magic

We’ve added two new features related to MAC addresses to this release. One of them is the “MAC Age” field (showing “2000-11-09” in the previous screenshot), which is a guesstimate of how hold a device/host is based on its MAC address. This functionality uses HD Moore’s mac-ages database, which contains approximate dates for when hardware address ranges were allocated by IEEE (original concept from DeepMac).

The second MAC feature is a simple yet useful feature that adds links between hosts that share the same MAC address. This feature is useful for linking a host's IPv6 and IPv4 addresses with each other, but it can also be used to track if a physical host has changed its IP address. The MAC address links can be accessed by expanding the MAC address node in NetworkMiner’s Hosts tab.

IPv4 and IPv6 address with the same MAC address
Image: NetworkMiner with a PCAP file from ISTS 2012

ICS Asset Inventory

Hard Hat

We’ve put in some ground work in order to create OS fingerprinting signatures for several Industrial Control System (ICS) devices. Our signatures have been submitted and merged into Eric Kollmann’s Satori TCP database, which NetworkMiner uses to passively fingerprint hosts by examining various TCP and IP fields in the initial SYN/SYN+ACK packets of TCP sessions. The ICS devices we’ve added include PLCs, RTUs as well as rugged network equipment from vendors like ABB, Allen-Bradley, Modicon, Moxa, Phoenix Contact and Siemens. Some ICS vendors even got an icon showing their logo in the Hosts tab (see the Siemens/RUGGEDCOM device in the screenshot below) while the others got a yellow hard hat.

Asset inventory list with ICS devices
Image: Asset inventory list generated by NetworkMiner usingPCAP files from the 4SICS 2015 ICS Lab.

EternalBlue

NetworkMiner isn’t designed to be used as an IDS. Nevertheless we decided to add detection for the EternalBlue exploit to NetworkMiner 2.4. The fact that NetworkMiner parses NetBIOS and SMB makes it pretty straightforward to identify when an attacker is attempting toallocate a large non-paged pool in srvnet.sys by using a vulnerability in Microsoft’s SMB implementation (see MS17-010 for reference). This type of detection is difficult to perform using a standard IDS solution that cannot parse the NetBIOS and SMB protocols. Detected EternalBlue exploit attempts are listed in NetworkMiner's “Anomalies” tab. Example PCAP files with attackers/malware using the EternalBlue exploit can be found here:


NetworkMiner in Linux

NetworkMiner Loves Linux

NetworkMiner is a Windows tool, but it actually runs just fine also in other operating systems with help of the Mono Framework (see our guide “HowTo install NetworkMiner in Ubuntu Fedora and Arch Linux”). However, there are a few pitfalls that must be avoided to get the software running smoothly using Mono. With this release we’ve implemented workarounds for two bugs in Mono’s GUI implementation (System.Windows.Forms).

The first workaround handles a Mono bug that sometimes could be triggered by Drag-and-Dropping a file or image from NetworkMiner to another application, such as a browser, text editor or image viewer. Doing so would previously trigger a NullReferenceException in System.Windows.Forms.X11Dnd+TextConverter.SetData under certain conditions. We’re happy to report that you can now reliably drag and drop files extracted by NetworkMiner to other tools, even when running Linux.

The second workaround handles a bug in Mono’s GDIPlus implementation related to rendering of Unicode characters. We were unfortunately not able to reliably get Mono to render Unicode characters, NetworkMiner will therefore convert all Unicode MIME data to ASCII when using Mono (typically in Linux). Windows users will still get the proper Unicode representations of exotic characters and emojis in NetworkMiner though. ☺


NetworkMiner Professional

The commercial version of NetworkMiner, i.e.NetworkMiner Professional, comes with a few additional improvements. One of them is is that the following additional online sources have been added to theOSINT lookup feature:

OSINT lookup of file hash in NetworkMiner Professional
Image: OSINT lookup menu for .exe file extracted from Malware-Traffic-Analysis.net’s 2018-10-16-trickbot.pcap.

The CSV export from NetworkMinerCLI has been updated to use theISO 8601 format with explicit time zone for timestamps. An exported timestamp now look something like this:

2019-01-08T13:37:00.4711000+02:00

NetworkMiner Professional 2.4 also identifies application layer protocols regardless of port number (a.k.a. PIPI) with much better precision than earlier versions. It also extracts audio from VoIP calls (SIP) more reliably than before.


Credits

I would like to thank Chris Sistrunk for requesting GUI support to link IPv4 and IPv6 hosts with the same MAC address andJonas Lejon for the HKP GPG key extraction idea. I would also like to thank Phil Hagen for notifying us about the issue with Unicode in emails when running NetworkMiner under Mono and Ahmad Nawawi for notifying us about the protocol identification shortages in the previous version.


Upgrading to Version 2.4

Users who have purchased a license for NetworkMiner Professional 2.x can download a free update to version 2.4 from ourcustomer portal. Those who instead prefer to use the free and open source version can grab the latest version of NetworkMiner from the official NetworkMiner page.

⛏ FOR GREAT JUSTICE! ⛏

Facebook Share on Facebook  Twitter Tweet  Reddit Submit to reddit.com

Video: TrickBot and ETERNALCHAMPION

$
0
0

This video tutorial is a walkthrough of how you can analyze the PCAP fileUISGCON-traffic-analysis-task-pcap-2-of-2.pcap (created by Brad Duncan). The capture file contains a malicious Word Document (macro downloader), Emotet (banking trojan), TrickBot/Trickster (banking trojan) and an EternalChampion (CVE-2017-0146) exploit used to perform lateral movement.

Network Diagram

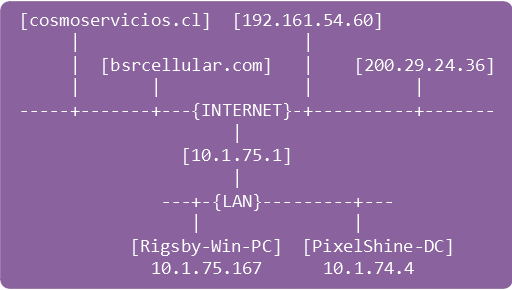
Network Diagram

Timeline of Events

FrameTime (UTC)Event
82518:55:32Malicious Word doc [cosmoservicios.cl]
109918:56:04Emotet download [bsrcellular.com]
502419:00:41Trickbot "radiance.png" download
960419:01:34Client credentials exfiltrated [200.29.24.36:8082]
991519:01:36ETERNALCHAMPION exploit from client to DC
1042419:01:51Client sends .EXE files to \\10.1.75.4\C$\WINDOWS\
1107819:01:51Client infects DC with Trickbot via rogue service
1431419:07:03DC credentials exfiltrated [200.29.24.36:8082]

OSINT Links Opened

Tools Used

Network Forensics Training

Wanna improve your network forensics skills? Take a look at ourtrainings, the next scheduled class is on March 18-19 at theTROOPERS conference in Germany.

Facebook Share on Facebook  Twitter Tweet  Reddit Submit to reddit.com

CapLoader 1.8 Released

$
0
0
CapLoader 1.8

We are happy to announce the release ofCapLoader 1.8 today!

CapLoader is primarily used to filter, slice and dice large PCAP datasets into smaller ones. This new version contains several new features that improves this filtering functionality even further. To start with, the “Keyword Filter” can now be used to filter the rows in the Flows, Services or Hosts tabs using regular expressions. This enables the use of matching expressions like this:

  • amazon|akamai|cdn
    Show only rows containing any of the strings “amazon” “akamai” or “cdn”.
  • microsoft\.com\b|windowsupdate\.com\b
    Show only servers with domain names ending in “microsoft.com” or “windowsupdate.com”.
  • ^SMB2?$
    Show only SMB and SMB2 flows.
  • \d{1,3}\.\d{1,3}\.\d{1,3}\.255$
    Show only IPv4 address ending with “.255”.

For a reference on the full regular expression syntax available in CapLoader, please seeMicrosoft’s regex “Quick Reference”.

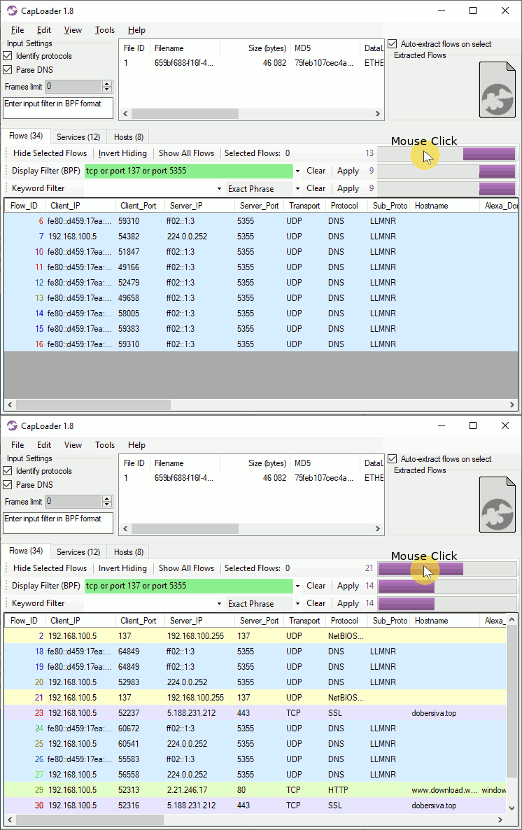
One popular workflow supported by CapLoader is to divide all flows (or hosts) into two separate datasets, for example one “normal” and one “malicious” set. The user can move rows between these two sets, where only one set is visible while the rows in the other set are hidden. To switch which dataset that is visible versus hidden the user needs to click the [Invert Hiding] button (or use the [Ctrl]+[Tab] key combination). With this new release we’ve also made the “Invert Hiding” functionality available by clicking the purple bar, which shows the number of rows present in the currently viewed set.

CapLoader Invert Hiding GIF

Readers with a keen eye might also notice that the purple bar charts are now also accompanied by a number, indicating how many rows that are visible after each filter is applied. The available filters are: Set Selection, BPF and Keyword Filter.

NetFlow + DNS = Great Success!

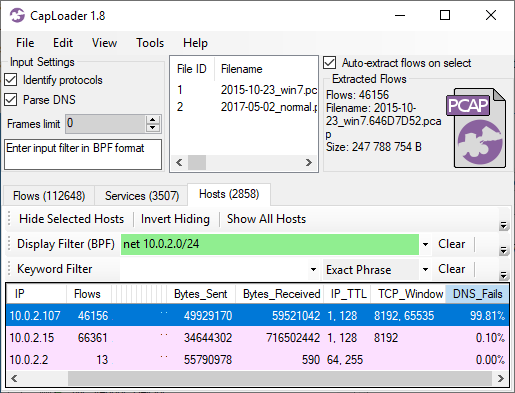
CapLoader’s main view presents the contents of the loaded PCAP files as a list of netflow records. Since the full PCAP is available, CapLoader also parses the DNS packets in the capture files in order to enrich the netflow view with hostnames. Recently PaC shared a great idea with us, why not show how many failed DNS lookups each client does? This would enable generic detection of DGA botnets without using blacklists. I’m happy to announce that this great idea made it directly into this new release! The rightmost column in CapLoader’s hosts tab, called “DNS_Fails”, shows how many percent of a client’s DNS requests that have resulted in an NXRESPONSE or SRVFAIL response.

CapLoader 1.8

Two packet capture files are loaded into CapLoader in the screenshot above; onePCAP file from a PC infected with the Shifu malware and onePCAP file with “normal traffic” (thanks @StratosphereIPS for sharing these capture files). As you can see, one of the clients (10.0.2.107) has a really high DNS failure ratio (99.81%). Unsurprisingly, this is also the host that was infected with the Shifu, which uses a domain generation algorithm (DGA) to locate its C2 servers.

Apart from parsing A and CNAME records from DNS responses CapLoader now also parses AAAA DNS records (IPv6 addresses). This enables CapLoader to map public domain names to hosts with IPv6 addresses.

Additional Updates

The new CapLoader release also comes with several other new features and updates, such as:

  • Added urlscan.io service for domain and IP lookups (right-click a flow or host to bring up the lookup menu).
  • Flow ID coloring based on 5-tuple, and clearer colors in timeline Gantt chart.
  • Extended default flow-timeout from 10 minutes to 2 hours for TCP flows.
  • Changed flow-timout for non-TCP flows to 60 seconds.
  • Upgraded to .NET Framework 4.7.2.

Updating to the Latest Release

Users who have previously purchased a license for CapLoader can download a free update to version 1.8 from our customer portal. All others can download a free 30 day trial from theCapLoader product page (no registration required).

Credits

We’d like to thank Mikael Harmark, Mandy van Oosterhout and Ulf Holmström for reporting bugs that have been fixed in this release. We’d also like to thank PaC for the DNS failure rate feature request mentioned in this blog post.

Facebook Share on Facebook  Twitter Tweet  Reddit Submit to reddit.com

PolarProxy Released

$
0
0

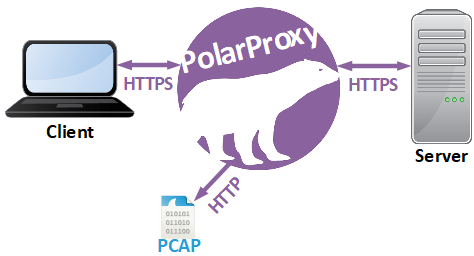
I’m very proud to announce the release of PolarProxy today! PolarProxy is a transparent TLS proxy that decrypts and re-encrypts TLS traffic while also generating a PCAP file containing the decrypted traffic.

PolarProxy flow chart

PolarProxy enables you to do lots of things that have previously been impossible, or at least very complex, such as:

  • Analyzing HTTP/2 traffic without an SSLKEYLOGFILE
  • Viewing decrypted HTTPS traffic in real-time using Wireshark
    PolarProxy -p 10443,80,443 -w - | wireshark -i - -k
  • Replaying decrypted traffic to an internal or external interface usingtcpreplay
    PolarProxy -p 10443,80,443 -w - | tcpreplay -i eth1 -
  • Forwarding of decrypted traffic to a NIDS (see tcpreplay command above)
  • Extracting DNS queries and replies fromDNS-over-TLS (DoT) orDNS-over-HTTPS (DoH) traffic
    PolarProxy -p 853,53 -p 443,80
  • Extracting email traffic from SMTPS, POP3S or IMAPS
    PolarProxy -p 465,25 -p 995,110 -p 993,143

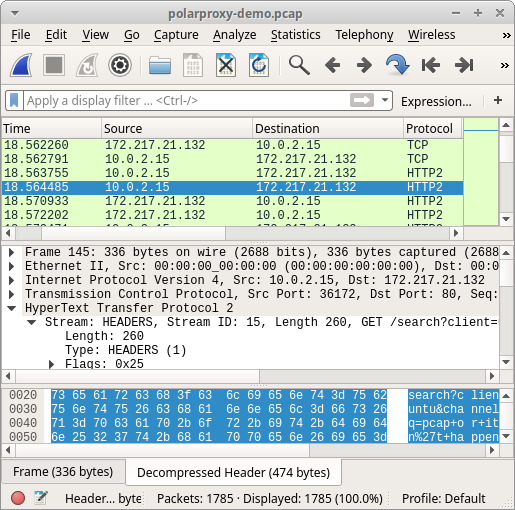
Here is an example PCAP file generated by PolarProxy:
https://www.netresec.com/files/polarproxy-demo.pcap

This capture files contains HTTP, WebSocket and HTTP/2 packets to Mozilla, Google and Twitter that would otherwise have been encrypted with TLS.

 HTTP/2 traffic from PolarProxy opened in Wireshark
Image: HTTP/2 traffic from PolarProxy opened in Wireshark

Now, head over to our PolarProxy page and try it for yourself (it’s free)!

Facebook Share on Facebook  Twitter Tweet  Reddit Submit to reddit.com

Raspberry PI WiFi Access Point with TLS Inspection

$
0
0

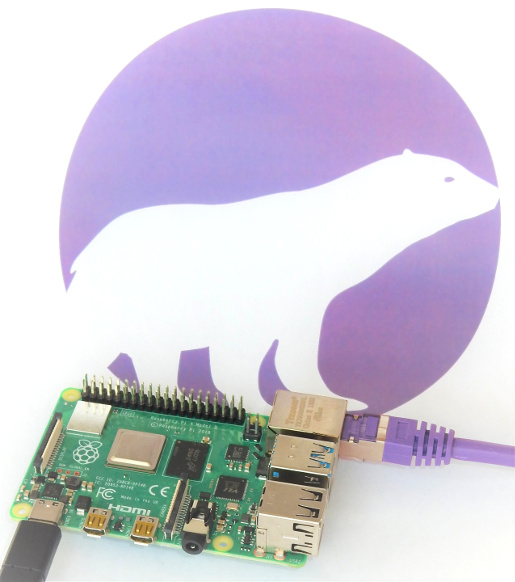
This is a how-to guide for setting up a Raspberry Pi as a WiFi Access Point, which acts as a transparent TLS proxy and saves the decrypted traffic in PCAP files.

Raspberry Pi 4 Model B running PolarProxy
Image: Raspberry Pi 4 Model B running PolarProxy

Step 1: Install PolarProxy for Linux ARM

We will start with installing PolarProxy, which will be used for the TLS decryption and re-encryption. The steps are almost identical to those in the official PolarProxy installation guide, except here we will download the "linux-arm" build of PolarProxy instead of the x64 version.

sudo adduser --system --shell /bin/bash proxyuser
sudo mkdir /var/log/PolarProxy
sudo chown proxyuser:root /var/log/PolarProxy/
sudo chmod 0775 /var/log/PolarProxy/
sudo su - proxyuser
mkdir ~/PolarProxy
cd ~/PolarProxy/
curl https://www.netresec.com/?Download=PolarProxy_linux-arm | tar -xzvf -
exit
sudo cp /home/proxyuser/PolarProxy/PolarProxy.service /etc/systemd/system/PolarProxy.service
sudo systemctl enable PolarProxy.service
sudo systemctl start PolarProxy.service

Verify that the PolarProxy service is running as expected with these commands:

systemctl status PolarProxy.service
journalctl -t PolarProxy

Step 2: Set up your Pi as a WiFi AP

The Raspberry Pi Foundation have a great guide for "Setting up a Raspberry Pi as a Wireless Access Point". Follow the instructions in their guide for the NAT mode setup (first section), but replace the iptables config with this:

sudo iptables -t nat -A POSTROUTING -o eth0 -j MASQUERADE
sudo iptables -A INPUT -i wlan0 -p tcp --dport 10443 -m state --state NEW -j ACCEPT
sudo iptables -t nat -A PREROUTING -i wlan0 -p tcp --dport 443 -j REDIRECT --to 10443
Then save the iptables rules with:
sudo sh -c "iptables-save > /etc/iptables.ipv4.nat"
Finally, edit /etc/rc.local and add this iptables-restore command just above "exit 0" to install the rules on boot.
iptables-restore < /etc/iptables.ipv4.nat

Step 3: Configure the Clients

The final step is to connect the clients (phones, tablets or computers) to the Raspberry Pi WiFi Access Point and install the root CA from PolarProxy.

Follow the instructions for "Trusting the PolarProxy root CA" in the official PolarProxy setup guide to install the public certificate from the TLS proxy in your clients. The certificate can be downloaded from the Raspberry Pi by browsing to http://192.168.4.1:10080/polarproxy.cer.

PCAP PCAP PCAP

Your Raspberry Pi WiFi AP will now intercept all HTTPS traffic going to tcp/443 and save the decrypted traffic in PCAP files, one per hour. The PCAP files with decrypted TLS traffic can be found in the/var/log/PolarProxy/ directory of your Raspberry Pi.

pi@raspberrypi:/var/log/PolarProxy $ ls *.pcap
proxy-190925-075704.pcap proxy-190925-152902.pcap
proxy-190925-085704.pcap proxy-190925-162902.pcap
proxy-190925-095704.pcap proxy-190925-172902.pcap
proxy-190925-105704.pcap proxy-190925-182902.pcap
proxy-190925-115704.pcap proxy-190926-062902.pcap
proxy-190925-125704.pcap proxy-190926-072902.pcap
proxy-190925-132704.pcap proxy-190926-082902.pcap
proxy-190925-132902.pcap proxy-190926-092902.pcap
proxy-190925-142902.pcap proxy-190926-102902.pcap
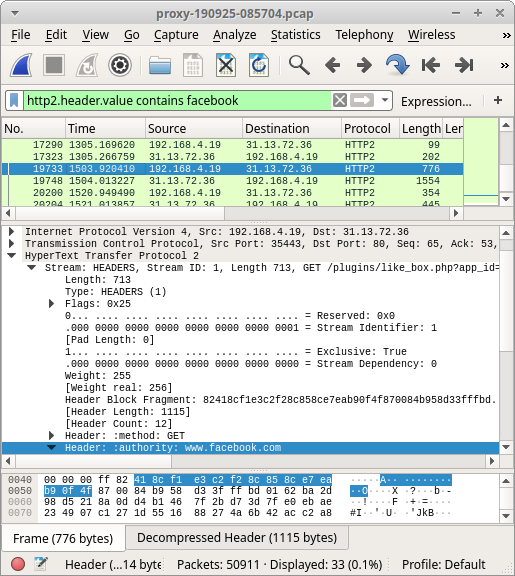
HTTP/2 traffic to Facebook opened in Wireshark
Image: Decrypted HTTP/2 traffic to Facebook opened in WiresharkFacebook Share on Facebook  Twitter Tweet  Reddit Submit to reddit.com

NetworkMiner 2.5 Released

$
0
0
NetworkMiner 2.5

I am happy to announce the release of NetworkMiner 2.5 today! This new version includes new features like JA3 and parsers for the HTTP/2 and DoH protocols. We have also added support for a few older protocols that are still widely used, such as Kerberos and the CIFS browser protocol. Additionally, NetworkMiner can now parse PCAP files up to twice as fast as before!

Improving Passive TLS Analysis with JA3

Almost all web traffic is TLS encrypted nowadays, which prevents incident responders, analysts and investigators from inspecting otherwise unencrypted HTTP traffic for clues about malicious behavior or criminal intent. This requires analysts to use alternative approaches, such as looking at hostnames and X.509 certificates. This type of analysis is supported by NetworkMiner, since it parsesServer Name Indication fields in client TLS handshakes and extracts X.509 certificates automatically when PCAP files are loaded.

In this release we’ve also added support for another passive TLS analysis technique called JA3, which is a method for fingerprinting TLS client implementations.

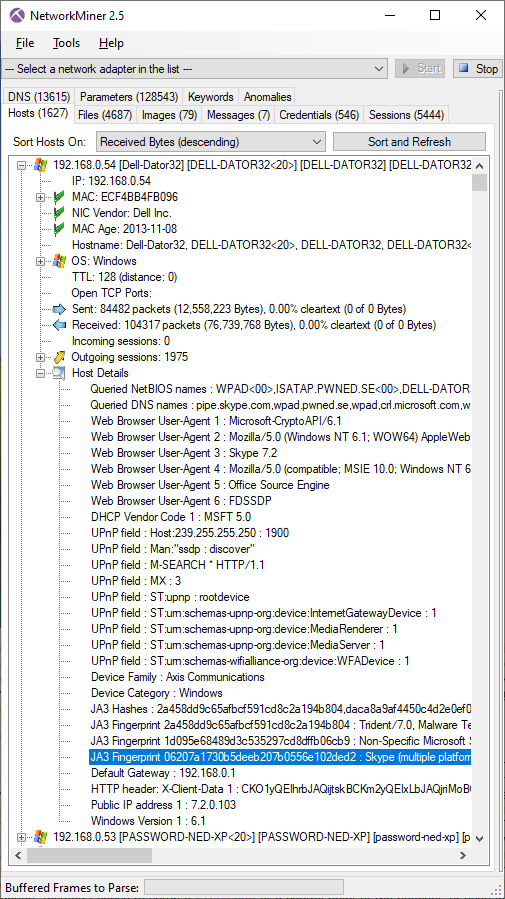
NetworkMiner leverages theJA3 fingerprint database from Trisul Network Analytics in order to match observed JA3 hashes to hashes of known malware and “normal” applications. This is what it looks like when the capture file “snort.log.1428364808”, from the FIRST 2015 “Hands-on Network Forensics” training (available here), has been loaded into NetworkMiner 2.5:

JA3 fingerprint of a Skype client

Image: JA3 fingerprint of a Skype client in NetworkMiner 2.5

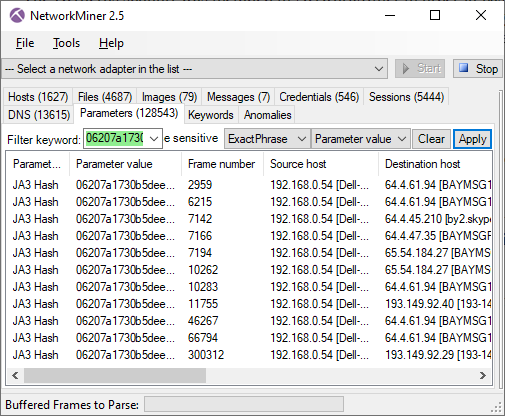
The JA3 hash is also available in the “Parameters” tab, which is useful in order to find out what hosts that particular TLS implementation was reaching out to.

Filtering on JA3 hash 06207a1730b5deeb207b0556e102ded2 in NetworkMiner 2.5

Image: Filtering on JA3 hash 06207a1730b5deeb207b0556e102ded2

HTTP/2 and DoH Support

Passive analysis of TLS traffic, such as HTTPS, often doesn’t give sufficient visibility. Many organizations therefore use TLS proxies in order to decrypt the traffic going in and out from their networks. However, more than half of all HTTPS traffic is actually http2 (RFC 7540) nowadays. This has previously been an issue for users who wanted to analyze decrypted http2 traffic from their TLS intercepting proxies with NetworkMiner. We’re happy to announce that NetworkMiner now can parse http2 traffic, that has been decrypted by a TLS proxy, and extract files from the http2 transfers.

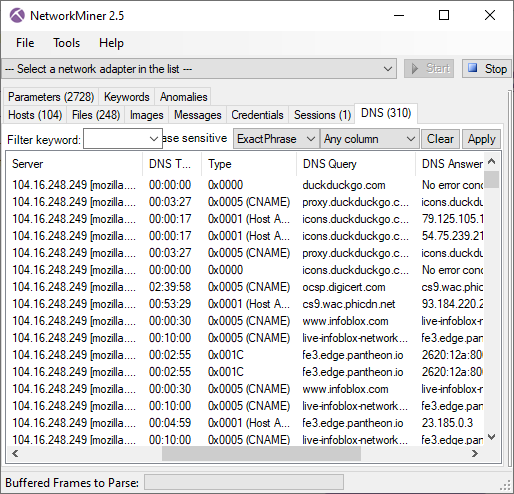
NetworkMiner 2.5 also supports the DNS over HTTPS (DoH) protocol (RFC 8484), which is a technique for sending DNS queries as http2 POST requests and parsing the returned data as DNS responses. We’ve incorporated the DoH data into NetworkMiner’s DNS tab, so that you can analyze it just like normal DNS traffic.

DoH traffic to mozilla.cloudflare-dns.com in NetworkMiner’s DNS tab

Image: DoH traffic to mozilla.cloudflare-dns.com in NetworkMiner’s DNS tab

Please note that NetworkMiner 2.5 does not perform TLS decryption. This means that NetworkMiner can only parse the contents of a TLS stream if it has been decrypted by a TLS proxy, such as PolarProxy.

Extracting Kerberos Hashes from PCAP

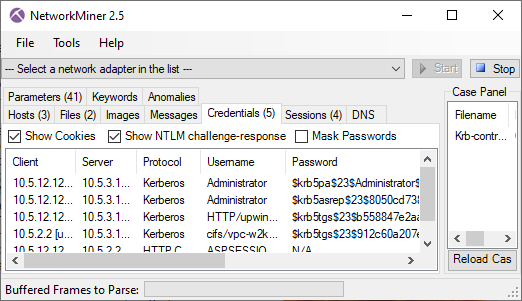
NetworkMiner’s support for the Kerberos protocol allows you to passively track which user accounts that are authenticating to what services, simply by monitoring network traffic. This is a feature is essential in order to track credential theft andlateral movement by adversaries inside your networks. After implementing kerberos username and hash extraction we realized that this feature could also be valuable for penetration testers. We therefore decided to present extracted Kerberos credentials in a format that is compatible with tools likehashcat and John the Ripper.

Kerberos krb5pa, krb5asrep and krb5tgs credentials extracted from the Wireshark sample capture file

Image: Kerberos krb5pa, krb5asrep and krb5tgs credentials extracted from the Wireshark sample capture fileKrb-contrained-delegation.cap

Even more NetBIOS and CIFS Artifacts!

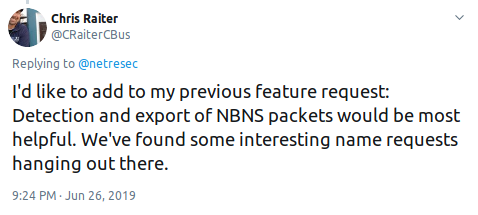
NetworkMiner is a popular tool for extracting files transferred over SMB and SMB2 from capture files. It can also extract a great deal of information about the communicating hosts from protocols like NetBIOS and SMB/CIFS, but earlier this yearChris Raiter notified us about an important piece of information that was missing in NetworkMiner: NetBIOS Name Service (NBNS) lookups and responses!

Detection and export of NBNS packets request on twitter

A couple of months laterDan Gunter sent us another great feature request for another protocol that runs on top of NetBIOS: the CIFS Browser Protocol (aka MS-BRWS).

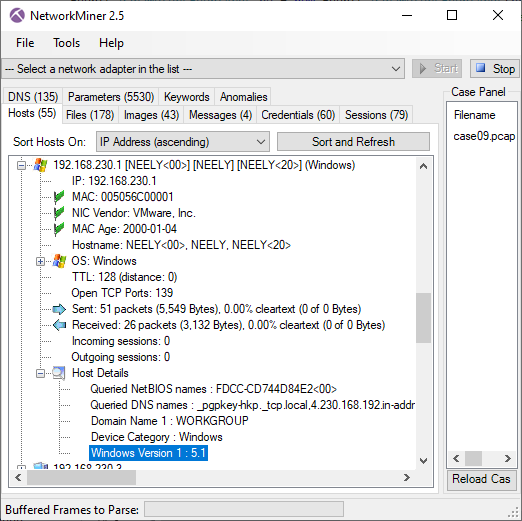
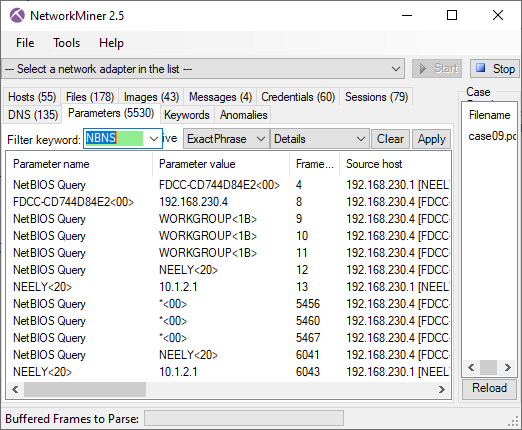
We’re happy to announce that NBNS queries and responses are now shown in NetworkMiner’s Parameters tab, and details like hostnames, domain names, Windows versions and uptime us extracted from the MS-BRWS protocol. See the screenshots below, which were created by loading the capture file “case09.pcap” from Richard Bejtlich’s TCP/IP Weapons School 2.0 Sample Lab into NetworkMiner 2.5. Thanks for sharing Richard!

Hostname, domain and Windows version extracted from MS-BRWS traffic

Image: Hostname, domain and Windows version extracted from MS-BRWS traffic

NBNS queries and responses in NetworkMiner’s Parameters tab

Image: NBNS queries and responses in NetworkMiner’s Parameters tab

Mono 5 Required for Linux and MacOS

Linux and MacOS users, who run NetworkMiner with help ofMono, will need to ensure they have Mono 5 (or later) installed in order to run NetworkMiner 2.5. We recommend using at least Mono 5.18.

Instructions for installing NetworkMiner on Linux can be found in our blog post”HowTo install NetworkMiner in Ubuntu Fedora and Arch Linux”.

MacOS users can refer to our“Running NetworkMiner on Mac OS X” blog post.

Users who are unable to install Mono 5 are recommended to use the old NetworkMiner 2.4 release, which can be downloaded here:https://www.netresec.com/?download=NetworkMiner_2-4

NetworkMiner Professional

Apart from the features mentioned so far, our commercial toolNetworkMiner Professional now comes with a few additional new features. One of these features is port independent identification of RDP traffic, so thatmstshash credentials can be extracted from RDP sessions even if the service doesn’t run on port 3389. The OSINT lookup context menus in NetworkMiner Professional have also been enriched with the following online services:

Several new features have also been included in the command line toolNetworkMinerCLI, including:

  • Recursive loading of PCAP files with the "-R” switch.
  • Configurable export types (hosts, files, DNS etc) with the “-x” switch.
  • Relative paths in CSV, XML and JSON/CASE exports unless the “-- absolutePaths” switch is used.

Credits

I’d like to thank Dan Gunter,Chris RaiterChris Sistrunk and a few more (who I cannot mention here) for contributing with feature requests and bug reports that have helped improve NetworkMiner.

Upgrading to Version 2.5

Users who have purchased a license for NetworkMiner Professional 2.x can download a free update to version 2.5 from our customer portal, or use the “Help > Check for Updates” feature. Those who instead prefer to use the free and open source version can grab the latest version of NetworkMiner from the official NetworkMiner page.

Facebook Share on Facebook  Twitter Tweet  Reddit Submit to reddit.com

Extracting Kerberos Credentials from PCAP

$
0
0
NetworkMiner + Cerberos

NetworkMiner is one of the best tools around for extracting credentials, such as usernames and passwords, from PCAP files. The credential extraction feature is primarily designed for defenders, in order to analyzecredential theft andlateral movement by adversaries inside your networks. But the credential extraction feature is also popular among penetration testers. In this blog post I will demo how Kerberos hashes can be extracted from captured network traffic with NetworkMiner, and how these hashes can be cracked in order to retrieve the clear text passwords.

Installing NetworkMiner in Kali Linux

I’m using a clean install of Kali Linux 2019.3, on which I have installed NetworkMiner by following the step-by-step instructions in our guide forinstalling NetworkMiner in Ubuntu, Fedora and Arch Linux.

NetworkMiner 2.5 in Kali Linux

Extracting Kerberos Hashes from PCAP

There is a capture file inWireshark’s sample captures called krb-816.cap. This capture file contains Kerberos traffic from a Windows XP machine, as two user accounts perform a domain logon. Let’s download that PCAP file and open it in NetworkMiner.

wget 'https://wiki.wireshark.org/SampleCaptures?action=AttachFile&do=get&target=krb-816.zip' -O krb-816.zip
unzip krb-816.zip
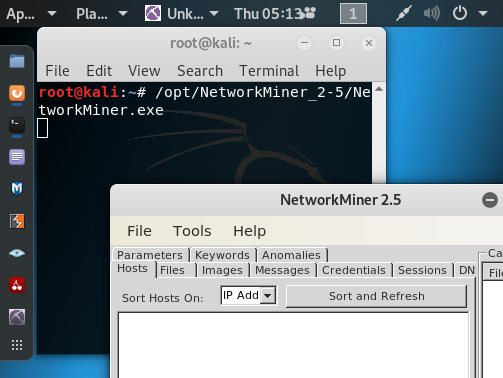
/opt/NetworkMiner_2-5/NetworkMiner.exe krb-816.cap

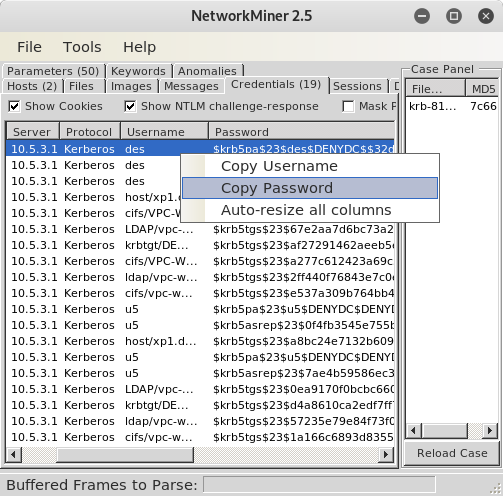
The “Credentials” tab contains the extracted Kerberos hashes. Right-click on the first $krb5pa$23$ hash and select “Copy Password” to put the password into the system clipboard.

Copy Kerberos hash to system clipboard in Linux

Paste the password to a text file, either using a text editor or directly from a shell.

Note: You'll need to do press Ctrl+Shift+Insert in GNOME Terminal to paste from the system clipboard, which is where NetworkMiner has put the password.

echo '$krb5pa$23$des$DENYDC$$32d396a914a4d0a78e979ba75d4ff53c1db7294141760fee05e434c12ecf8d5b9aa5839e09a2244893aff5f384f79c37883f154a' > krb5pa.hash

You can now try to crack the hash, for example by running John the Ripper (JtR) or hashcat.

john krb5pa.hash
Using default input encoding: UTF-8
Loaded 1 password hash (krb5pa-md5, Kerberos 5 AS-REQ Pre-Auth etype 23 [32/64])
[...]
Use the "--show" option to display all of the cracked passwords reliably
Session completed
john krb5pa.hash --show
?:123

1 password hash cracked, 0 left

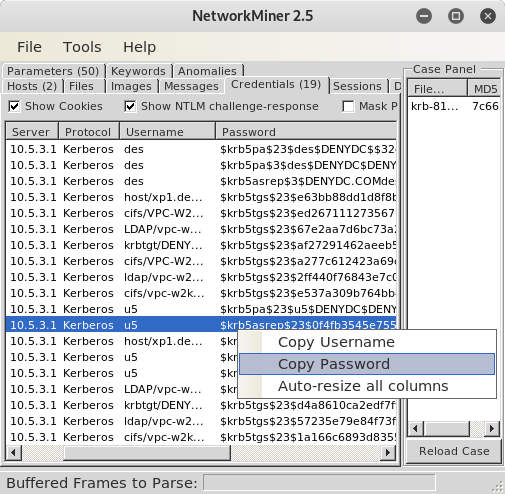
Yay! We now know that the password of user “des” was “123”. Let’s try to recover the password of the user “u5” as well, but this time we’ll use the $krb5asrep$23$ hash.

Copying the krb5asrep hash from NetworkMiner
john krb5asrep.hash
[...]
john krb5asrep.hash --show
?:123

1 password hash cracked, 0 left

Apparently the password for user u5 was “123” as well.

If you wanna replace JtR with hashcat, then make sure to use the following hash modes:

  • $krb5pa$23$: hashcat -m 7500
  • $krb5tgs$23$: hashcat -m 13100
  • $krb5asrep$23$: hashcat -m 18200
For other hash types, please see the hashcat example hashes.

Running the Command Line version of NetworkMiner

The commercial version of NetworkMiner comes with a command line tool calledNetworkMinerCLI. You can extract the Kerberos hashes from a PCAP file and save them to a CSV file using NetworkMinerCLI like this:

/opt/NetworkMinerProfessional_2-5/NetworkMinerCLI.exe -r krb-816.cap -f CSV_NoNewlines
Closing file handles...
32 frames parsed in 0.1337 seconds.

NetworkMinerCLI has now created a set of CSV files, one for each type/class of information found in the capture file. In this case we want thekrb-816.cap.Credentials.csv file, in which the hashes and passwords are in column 5:

cut -d, -f5 krb-816.cap.Credentials.csv
"Password"
"$krb5pa$23$des$DENYDC$$32d396a914a4d0a78e979ba75d4ff53c1db72941417 60fee05e434c12ecf8d5b9aa5839e09a2244893aff5f384f79c37883f154a"
"$krb5pa$3$des$DENYDC$DENYDC.COMdes$233b4272aa93727221facfdbdcc9d1d 9a0c43a2798c810600310c0daf48fb969c26cb47d69f575a65e00163845f68811f9 c5266271cc0f91"
"$krb5asrep$3$DENYDC.COMdes$edbcc0d67f3a645254f086e6$e2bfe2b7bbac72 b346ad05abb8326f6d684dcb52b6c2f446921417579e038103eb2e9039aa3a2db85 c8e1afc2ed56130b4855834725096edb74d1582920b3b1b7e30ef51b14c89774871 47b868c3e0f7c3e8c5d5618b9dfa0fd90e62c35f8bd41ab283d87155cd51a01b8ce d6411f1f0e060d9b4a78de2afc281756a0030453418d263784f91725387d7469820 904b646ac519384f24d6ff769b7af8594c8a02c0cf691d38bf115b588848ed7acf5 ac7fae159a13590094fc199d85522a97c4213cc68845023c7f12f7da9e7623e4ed0 241ad1145418b3cc373dc59c71b6cafec370557816f949c736497f12313fd76d4ee ffc9ded11605fe52e8171fa6026d68f1ade93"
[...]
Facebook Share on Facebook  Twitter Tweet  Reddit Submit to reddit.com

The NSA HSTS Security Feature Mystery

$
0
0
NSA TLSI advisory header

I recently stumbled across an NSA Cyber Advisory titledManaging Risk from Transport Layer Security Inspection (U/OO/212028-19) after first learning about it through Jonas Lejon’s blog post NSA varnar för TLS-inspektion (Swedish). I read the NSA report with great interest since I wanted to see how our own TLS interception toolPolarProxy stands up to the risks identified in the advisory.

I highly respect the NSA’s knowledge in the fields of cryptography and security, which is why I read the advisory as if it was the definite guide on how to perform TLS inspection in a secure manner. However, towards the end of the advisory I got stuck on this paragraph, which I was unable to understand:

HTTP Strict Transport Security (HSTS) includes a security feature that binds the HTTP session to the specific TLS session used. TLSI systems that ignore the underlying HTTP headers will cause HSTS sessions to be rejected by the client application, the server, or both.

WUT?!?! HSTS (RFC 6797) is designed to protect against attacks likeMoxie Marlinspike’s 10 year old sslstrip, which fools the client into using unencrypted HTTP instead of HTTPS. As far as I know, HSTS does not support binding an HTTP session to a specific TLS session.

What is HSTS?

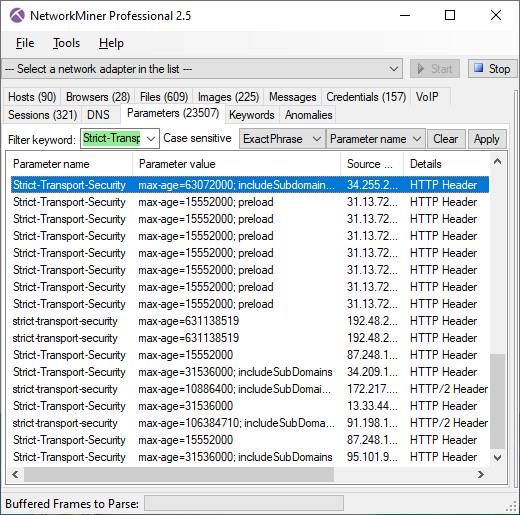
HSTS is a simple HTTP header sent by the web server to inform the browser that it should only load the site using HTTPS. The header can look like this:

strict-transport-security: max-age=47111337; includeSubDomains; preload
NetworkMiner 2.5 showing HSTS headers from HTTP/1.1 and HTTP/2 traffic

Image: NetworkMiner 2.5 showing HSTS headers from HTTP/1.1 and HTTP/2 traffic

The PCAP file loaded intoNetworkMiner in screenshot above contains HTTPS traffic that has been decrypted by PolarProxy. You can also use Wireshark or tshark to find HSTS headers by using the following display filter:

http.response.line matches "Strict-Transport-Security" or http2.header.name matches "Strict-Transport-Security"

Notice the use of “matches” to get case insensitive matching of “Strict-Transport-Security” and the duplicated statements required to get the filter to match headers in both HTTP/1.1 and HTTP/2.

Back to the NSA Advisory

I simply couldn’t understand NSA’s statement about the HSTS “security feature” that binds the HTTP session to the specific TLS session used, because I’m not aware of any such feature in HSTS and my google-fu was to weak to find any such feature. I therefore resorted to asking folks on Twitter if they knew about this feature.

Nick Sullivan (Head of Research and Cryptography at Cloudflare) kindly replied on twitter that they probably mean“Token Binding” (RFC 8471). Peter Wu (Wireshark core developer and TLS expert) additionally replied that the NSA perhaps were referring to the Sec-Token-Binding header name in RFC 8473 (which has nothing to do with HSTS).

Backed by these two experts in TLS and HTTPS I can confidently conclude that the authors of the NSA’s Transport Layer Security Inspection (TLSI) advisory have either misunderstood what HSTS is or made some form of typo. I have reported this error to the NSA, but have not yet received any response.

Other Issues in NSA’s TLSI Advisory

This experience dented my faith in the TLS expertise of the NSA in general and in particular the authors of this advisory. I therefore decided to re-read the TLSI advisory, but this time without the “NSA knows this stuff” glasses I had on before. This time I found several additional claims and statements, which I didn’t agree with, in the four page advisory.

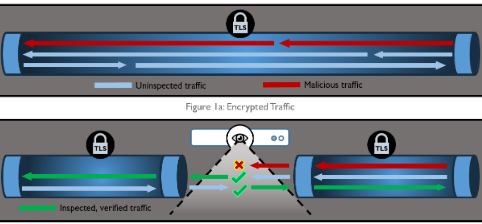
To start with, the first figure in the document depicts two setups where one is allowing end-to-end encryption between the client and server, while the other is using TLS inspection.

Encrypted Traffic (top) and TLS Inspection (bottom) as shown in NSA’s TLSI advisory

Image: Encrypted Traffic (top) and TLS Inspection (bottom) as shown in NSA’s TLSI advisory

In the end-to-end setup we see the malicious traffic passing straight to the client, while in the second setup the malicious traffic is blocked by the TLSI device. This image is accompanied by the following text:

A TLSI capability implemented within a forward proxy between the edge of the enterprise network and an external network such as the Internet protects enterprise clients from the high risk environment outside the forward proxy.

My experience is that blocking traffic in this way is more likely to provide a false sense of security than improved protection against malware. It is better to use TLSI to detect intrusions than to try to block them.

This probably sounds counter-intuitive, as you might reason that“if you can detect it, why can't you prevent it?”. I’m not going to go into a lengthy explanation of the “Prevention Eventually Fails” paradigm here, instead I’d recommend reading Richard Bejtlichs book “The Tao of Network Security Monitoring” or his more recent book “The Practice of Network Security Monitoring”. You can also read Richards blog post about ”The Problem with Automated Defenses” or Phil Hagen’s “What to Do When Threat Prevention Fails”.

TLSI products should primarily be used to provide visibility in order to detect and respond to malware and intrusions. Many TLSI products can block some attacks, but they don’t really provide perimeter security. Unfortunately the NSA advisory might further strengthen this false sense of security with the mentioned image and accompanying text.

DO IT WELL, DO IT ONCE

The NSA advisory states:

To minimize the risks described above, breaking and inspecting TLS traffic should only be conducted once within the enterprise network. Redundant TLSI, wherein a client-server traffic flow is decrypted, inspected, and re-encrypted by one forward proxy and is then forwarded to a second forward proxy for more of the same, should not be performed.

In general, I agree with this statement. Unfortunately many TLSI products do not “do it well”, which is why “do it once” is not always enough. One such situation is when a PC is believed to be infected with malware, but further investigation is required to know for sure. Many TLSI products apply lock-in techniques that prevent incident responders from analyzing the decrypted traffic with external tools. This forces IR teams to add an extra TLS proxy when their enterprise TLSI product does not provide sufficient visibility. PolarProxy is, in fact, designed to support that type of agile TLSI deployment, in order to enable decryption and inspection of TLS traffic from a particular machine during an incident.

Final Words about the Advisory and TLS Inspection

Even through this blog post criticizes parts of the NSA TLSI advisory, I’d still like to end with saying that it also brings a lot of good stuff to the table. The issues mentioned in this blog post are actually just minor ones, which hopefully won’t have any negative impact on future TLSI deployments. In fact, the positive aspects of the advisory by far outweighs the negative ones. I also hope this blog post can help get more discussions going about TLS inspection, such as if we need it, what problems it can solve and what risks we take by deploying it.

Facebook Share on Facebook  Twitter Tweet  Reddit Submit to reddit.com

Installing a Fake Internet with INetSim and PolarProxy

$
0
0
INetSim + PolarProxy

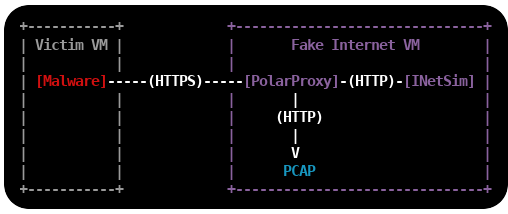
This is a tutorial on how to set up an environment for dynamic malware analysis, which can be used to analyze otherwise encrypted HTTPS and SMTPS traffic without allowing the malware to connect to the Internet. Dynamic malware analysis (or behavioral analysis) is performed by observing the behavior of a malware while it is running. The victim machine, which executes the malware, is usually a virtual machine that can be rolled back to a clean state when the analysis is complete. The safest way to prevent the malware from infecting other machines, or doing other bad things like sending SPAM or taking part in DDoS attacks, is to run the victim machine in an offline environment. However, network traffic analysis of malware is a central part of dynamic malware analysis, which is is why a “fake Internet” is needed in most malware labs.

INetSim and PolarProxy

INetSim is a software suite that simulates common internet services like HTTP, DNS and SMTP, which useful when analyzing the network behavior of malware samples without connecting them to the Internet. INetSim also has basic support for TLS encrypted protocols, like HTTPS, SMTPS, POP3S and FTPS, but requires a pre-defined X.509-certificate to be loaded at startup. This can cause malware to terminate because theCommon Names (CN) in the presented certificates don’t match the requested server names. The victim machine will actually get the exact same certificate regardless of which web site it visits. INetSim’s TLS encryption also inhibits analysis of the network traffic captured in the malware lab, such as C2 traffic or SPAM runs, because the application layer traffic is encrypted. PolarProxy can solve both these issues because it generates certificates on the fly, where the CN value is dynamically set to the requested host name, and saves the network traffic in decrypted form to PCAP files. It is therefore a good idea to replace the TLS services in INetSim with PolarProxy, which will be used as a TLS termination proxy that forwards the decrypted traffic to INetSim’s cleartext services.

Malware Lab Setup

Install Linux

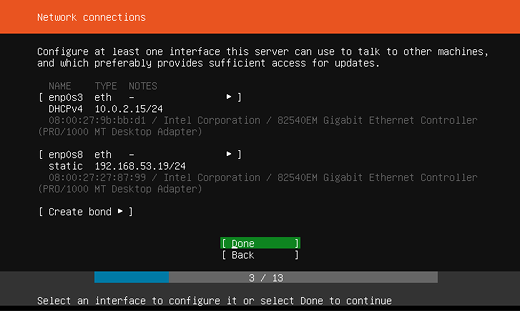
The first step is to install a Linux VM, which will act as a fake Internet to the victim machine(s). I'm using Ubuntu Server 18.04.3 LTS in this tutorial, but you can use any 64-bit linux distro. I'm adding two network interfaces to the Linux VM, one interface with Internet access and one that connects to an isolated offline network to which the victim VM's will be connected. The offline interface is configured to use the static IP 192.168.53.19.

Important: Do not bridge, bond or enable IP forwarding between the two interfaces!

Network connection config Ubuntu Server 18.04

Install INetSim

INetSim is available in Ubuntu's repo, so it is possible to install it with "apt install inetsim". However, I recommend installing INetSim as described in the official documentation to get the latest packaged version of INetSim.

sudo -s

echo "deb http://www.inetsim.org/debian/ binary/" > /etc/apt/sources.list.d/inetsim.list

curl https://www.inetsim.org/inetsim-archive-signing-key.asc | apt-key add -

apt update

apt install inetsim

exit

INetSim listens on 127.0.0.1 by default, change this to INetSim's offline IP address by un-commenting and editing theservice_bind_address variable in /etc/inetsim/inetsim.conf.

service_bind_address    192.168.53.19

Also configure INetSim's fake DNS server to resolve all domain names to the IP of INetSim with the dns_default_ip setting:

dns_default_ip    192.168.53.19

Finally, disable the "start_service https" and "start_service smtps" lines, because these services will be replaced with PolarProxy:

start_service dns
start_service http
#start_service https
start_service smtp
#start_service smtps

Restart the INetSim service after changing the config.

sudo systemctl restart inetsim.service

Verify that you can access INetSim's HTTP server with curl:

curl http://192.168.53.19

<html>
  <head>
    <title>INetSim default HTML page</title>
  </head>
  <body>
    <p></p>
    <p align="center">This is the default HTML page for INetSim HTTP server fake mode.</p>
    <p align="center">This file is an HTML document.</p>
  </body>
</html>

It looks like INetSim's web server can be accessed alright.

Install PolarProxy

Next step is to install PolarProxy as a systemd service (as instructed here):

sudo adduser --system --shell /bin/bash proxyuser

sudo mkdir /var/log/PolarProxy

sudo chown proxyuser:root /var/log/PolarProxy/

sudo chmod 0775 /var/log/PolarProxy/

sudo su - proxyuser

mkdir ~/PolarProxy

cd ~/PolarProxy/

curl https://www.netresec.com/?download=PolarProxy | tar -xzvf -

exit

sudo cp /home/proxyuser/PolarProxy/PolarProxy.service /etc/systemd/system/PolarProxy.service

We will need to modify the PolarProxy service config file a bit before we start it. Edit the ExecStart setting in /etc/systemd/system/PolarProxy.service to configure PolarProxy to terminate the TLS encryption for HTTPS and SMTPS (implicitly encrypted email submission). The HTTPS traffic should be redirected to INetSim's web server on tcp/80 and the SMTPS to tcp/25.

ExecStart=/home/proxyuser/PolarProxy/PolarProxy -v -p 10443,80,80 -p 10465,25,25 -x /var/log/PolarProxy/polarproxy.cer -f /var/log/PolarProxy/proxyflows.log -o /var/log/PolarProxy/ --certhttp 10080 --connect 192.168.53.19 --terminate --connect 192.168.53.19 --nosni nosni.inetsim.org

Here's a break-down of the arguments sent to PolarProxy through the ExecStart setting above:

  • -v : verbose output in syslog (not required)
  • -p 10443,80,80 : listen for TLS connections on tcp/10443, save decrypted traffic in PCAP as tcp/80, forward traffic to tcp/80
  • -p 10465,25,25 : listen for TLS connections on tcp/10465, save decrypted traffic in PCAP as tcp/25, forward traffic to tcp/25
  • -x /var/log/PolarProxy/polarproxy.cer : Save certificate to be imported to clients in /var/log/PolarProxy/polarproxy.cer (not required)
  • -f /var/log/PolarProxy/proxyflows.log : Log flow meta data in /var/log/PolarProxy/proxyflows.log (not required)
  • -o /var/log/PolarProxy/ : Save PCAP files with decrypted traffic in /var/log/PolarProxy/
  • --certhttp 10080 : Make the X.509 certificate available to clients over http on tcp/10080
  • --terminate : Run PolarProxy as a TLS termination proxy, i.e. data forwarded from the proxy is decrypted
  • --connect 192.168.53.19 : forward all connections to the IP of INetSim
  • --nosni nosni.inetsim.org : Accept incoming TLS connections without SNI, behave as if server name was "nosni.inetsim.org".

Finally, start the PolarProxy systemd service:

sudo systemctl enable PolarProxy.service

sudo systemctl start PolarProxy.service

Verify that you can reach INetSim through PolarProxy's TLS termination proxy using curl:

curl --insecure --connect-to example.com:443:192.168.53.19:10443 https://example.com

<html>
  <head>
    <title>INetSim default HTML page</title>
  </head>
  <body>
    <p></p>
    <p align="center">This is the default HTML page for INetSim HTTP server fake mode.</p>
    <p align="center">This file is an HTML document.</p>
  </body>
</html>

Yay, it is working! Do the same thing again, but also verify the certificate against PolarProxy's root CA this time. The root certificate is downloaded from PolarProxy via the HTTP service running on tcp/10080 and then converted from DER to PEM format using openssl, so that it can be used with curl's "--cacert" option.

curl http://192.168.53.19:10080/polarproxy.cer > polarproxy.cer

openssl x509 -inform DER -in polarproxy.cer -out polarproxy-pem.crt

curl --cacert polarproxy-pem.crt --connect-to example.com:443:192.168.53.19:10443 https://example.com

<html>
  <head>
    <title>INetSim default HTML page</title>
  </head>
  <body>
    <p></p>
    <p align="center">This is the default HTML page for INetSim HTTP server fake mode.</p>
    <p align="center">This file is an HTML document.</p>
  </body>
</html>

Yay #2!

Now let's set up routing to forward all HTTPS traffic to PolarProxy's service on tcp/10443 and SMTPS traffic to tcp/10465. I'm also adding a firewall rule to redirect ALL other incoming traffic to INetSim, regardless of which IP it is destined to, with the final REDIRECT rule. Make sure to replace "enp0s8" with the name of your interface.

sudo iptables -t nat -A PREROUTING -i enp0s8 -p tcp --dport 443 -j REDIRECT --to 10443

sudo iptables -t nat -A PREROUTING -i enp0s8 -p tcp --dport 465 -j REDIRECT --to 10465

sudo iptables -t nat -A PREROUTING -i enp0s8 -j REDIRECT

Verify that the iptables port redirection rule is working from another machine connected to the offline 192.168.53.0/24 network:

curl --insecure --resolve example.com:443:192.168.53.19 https://example.com

<html>
  <head>
    <title>INetSim default HTML page</title>
  </head>
  <body>
    <p></p>
    <p align="center">This is the default HTML page for INetSim HTTP server fake mode.</p>
    <p align="center">This file is an HTML document.</p>
  </body>
</html>

Yay #3!

curl --insecure --resolve example.com:465:192.168.53.19 smtps://example.com

214-Commands supported:
214- HELO MAIL RCPT DATA
214- RSET NOOP QUIT EXPN
214- HELP VRFY EHLO AUTH
214- ETRN STARTTLS
214 For more info use "HELP <topic>".

Yay #4!

It is now time to save the firewall rules, so that they will survive reboots.

sudo apt-get install iptables-persistent

Install the Victim Windows PC

Configure a static IP address on the victim Windows host by manually setting the IP address. Set the INetSim machine (192.168.53.19) as the default gateway and DNS server.

Windows IPv4 Properties

Download the X.509 root CA certificate from your PolarProxy installation here:http://192.168.53.19:10080/polarproxy.cer

  1. Double-click on "polarproxy.cer"
  2. Click [Install Certificate...]
  3. Select 🔘 Local Machine and press [Next]
  4. Select 🔘 Place all certificates in the following store and press [Browse...]
  5. Choose "Trusted Root Certification Authorities" and press [OK], then [Next]
  6. Press [Finish]

You might also want to install the PolarProxy certificate in your browser. This is how you install it to Firefox:

  1. Options / Preferences
  2. Press [Privacy & Security]
  3. Scroll down to "Certificates" and press [View Certificates...]
  4. In the "Authorities" tab, press [Import...]
  5. Open "polarproxy.cer"
  6. ☑ Trust this CA to identify websites. (check the box)
  7. Press [OK]

Now, open a browser and try visiting some websites over HTTP or HTTPS. If you get the following message regardless of what domain you try to visit, then you've managed to set everything up correctly:

This is the default HTML page for INetSim HTTP server fake mode.

This file is an HTML document.

Accessing the Decrypted Traffic

PCAP files with decrypted HTTPS and SMTPS traffic are now available in /var/log/PolarProxy/

PolarProxy will start writing to a new capture file every 60 minutes. However, the captured packets are not written to disk instantly because PolarProxy uses buffered file writing in order to improve performance. You can restart the proxy service if you wish to flush the buffered packets to disk and have PolarProxy rotate to a new capture file.

sudo systemctl restart PolarProxy

I also recommend capturing all network traffic sent to INetSim with a sniffer likenetsniff-ng. This way you’ll get PCAP files with traffic from INetSim’s cleartext services (like DNS and HTTP) as well.

PCAP or it didn’t happen!

Credits

I'd like to thank Thomas Hungenberg and Patrick Desnoyers for providing valuable feedback for this blog post!

Facebook Share on Facebook  Twitter Tweet  Reddit Submit to reddit.com
Viewing all 160 articles
Browse latest View live